These cookies are special because unlike the vast majority of things I make that come to me from the internet, this recipe is from my family. Mimi was my great-great-grandmother, on my father's side. She died a week before her 100th birthday in 1983, so I never had the opportunity to meet her. By all accounts, though, she was quite a remarkable individual.
However, my uncle recently unearthed her sugar cookie recipe and I thought it might be nice to share them since I am making them later today. As trendy as making nontraditional things seems to be nowadays (which I love), I still think everyone can use a solid sugar cookie dough. I haven't changed the recipe at all, it is exactly as it appears when she wrote it down.
Mimi's Sugar Cookies
1 cup butter
1½ cups sugar
2 well beaten eggs
3 cups flour
1 teaspoon salt
1½ teaspoons vanilla
Mix the butter, sugar, and eggs with 3 cups of sifted flour. Add 1 teaspoon of salt and 1½ teaspoons of vanilla. Chill well and roll thin. Sprinkle with sugar and bake at 350 for about 8 minutes.
I hope you all have a lovely new year's eve! Best of luck in 2012 to you!

One little dinosaur's adventures through quilting and cooking.
December 31, 2011
December 26, 2011
Happy Holidays!
With Christmas over and Chanukah winding down, I hope you all had lovely holidays with your families. Hubby and I spent the weekend with his family, which unfortunately involved an 8 hour drive each way. I think I need a vacation from the drive home, but we had such a wonderful time while we were visiting.
I have many projects to jump back into, so tomorrow I will be right back into it. There are several quilts that are mid-way and there's no time like the present to get them finished up. Hopefully I can get them finished in time to start the new year off with a clean quilting slate. I will also be posting a monogramming update soon!
 |
| Yup, I spent Christmas at a waterpark. |
 |
| Winter wonderland! |
December 21, 2011
Singer L-500: First Impressions
I spent a good deal of time on the machine today. I did some basic straight stitches as well as some zigzags on some appliqués. I was working on a last minute holiday gift that I had been putting off in order to test the machine out with it.
So far, I am fairly impressed with its performance and features. First and foremost, I love the throat space. My old machine, like most standard home sewing machines, had just a hair under 6" of throat space. This machine has 9" and I am already in love with it. It is going to make quilting a lot easier and more enjoyable.
The LCD display is informative and easy to use, as well. It's quick to read and changing your settings is simple right from the start. It will even sew itself without the use of the presser foot by hitting a button. You can stop it by pushing the button again. One of the more nifty features is that it will cut the threads for you when you're done sewing.
My only major beef (so far, anyway) is the bobbin set up. It's a front loading bobbin, which sounds really handy. It is, in fact, a major pain in the ass. To get to it, you have to slide the table/accessory box off (just like you would to use the free arm). Then you have to flip open a hatch under the needle plate to access the bobbin holder. You have to pop out the bobbin holder, and then take the bobbin out of it. That doesn't even address setting up the bobbin in the holder in the first place (which is also a pain).
Changing the bobbin while sewing a pile of 5"x5" squares together is inconvenient at best. However, doing so, say, in the middle of quilting a top, would be no less of an interruption than a top loading bobbin, except that it takes three times as long to load the bobbin in. I will definitely miss, even mourn, the loss of my top loading bobbin.
I'm hoping that sometime tomorrow I will get a chance to practice with the monogramming. I also have to pack for our holiday trip to visit family. I may also try to get a jump start on my cleaning the house from tip to tail because we're having a friend stay with us for a few weeks after the holidays. After I try out some more things on the machine I will give an additional review.
 |
| Very happy with how the appliqué turned out. |
The LCD display is informative and easy to use, as well. It's quick to read and changing your settings is simple right from the start. It will even sew itself without the use of the presser foot by hitting a button. You can stop it by pushing the button again. One of the more nifty features is that it will cut the threads for you when you're done sewing.
My only major beef (so far, anyway) is the bobbin set up. It's a front loading bobbin, which sounds really handy. It is, in fact, a major pain in the ass. To get to it, you have to slide the table/accessory box off (just like you would to use the free arm). Then you have to flip open a hatch under the needle plate to access the bobbin holder. You have to pop out the bobbin holder, and then take the bobbin out of it. That doesn't even address setting up the bobbin in the holder in the first place (which is also a pain).
Changing the bobbin while sewing a pile of 5"x5" squares together is inconvenient at best. However, doing so, say, in the middle of quilting a top, would be no less of an interruption than a top loading bobbin, except that it takes three times as long to load the bobbin in. I will definitely miss, even mourn, the loss of my top loading bobbin.
I'm hoping that sometime tomorrow I will get a chance to practice with the monogramming. I also have to pack for our holiday trip to visit family. I may also try to get a jump start on my cleaning the house from tip to tail because we're having a friend stay with us for a few weeks after the holidays. After I try out some more things on the machine I will give an additional review.
December 20, 2011
Hellooo Singer L-500!
I have a new love- and it has a long arm and dual-feed system. I will probably not be seen or heard from for weeks because I will be swallowed up by all the sewing projects I have started but not yet finished. It has features I've never had before, including two alphabets. I believe there is much monogramming in my future.
Technically speaking, it was my holiday gift from my wonderful hubby and both our families, but I managed to get it early due to our holiday travel schedule. Which means tomorrow I will be testing out as many bells and whistles as I can manage to pack into one day. The manual is the size of a small novella, so I have some light reading to do before I can try anything too new.
 |
| Swoon. |
December 14, 2011
New Year's Eve Sari
A good friend of mine and his wife are having a big New Year's Eve party, and this year's theme is India. In keeping with the theme, they've asked that everyone wear traditional Indian clothing, which means I finally have an excuse to wear a sari.
Saris are the beautiful, long fabric wraps traditionally worn by Indian women. I have always been fascinated by the gorgeous fabrics and embroidery that go into one. However, I have been unable to find a place nearby where I can purchase one. Most website ship directly from India, which means the sari might not arrive in time for the party. This left me with one option- to buy some fabric and make my own (it's tragic, really).
Now, it turns out that your neighborhood Big Box Fabric Store actually sells sari fabric. It's in the brocade section. Both edges are finished with a traditional border and all you need to do is buy enough yardage to wrap it and make your matching blouse (called a choli), which is about 6 yards. I thought, lucky me! But unfortunately, none of the stores in my area had enough yardage on the bolts I wanted.
Not to be discouraged, I searched around and found a home dec taffeta in a gorgeous dark red. I knew I had to make my sari out of it. I even found a golden embroidery thread to coordinate. I got 7 yards because it was on sale for $4 a yard (from $25 a yard, I believe) and I wanted to make sure I'd have enough extra to practice the embroidery. I had never done free motion machine embroidery before, but I imagined it couldn't be much more different from free motion quilting than using embroidery specific needle and thread.
December 12, 2011
Vegetable Stir Fry
We meet again, Monday. I have got a tasty recipe for today's venture into vegetarianism. It's a simple fried rice recipe that cooks up quick and is nice and comforting.
You don't need a wok for this recipe, but it helps, and no matter what you want your pan to be very hot when you add the rice. You also don't have to use sesame seed oil, but it gives it a little extra depth that I like.
Now, I am of the opinion that eggs are not meat, therefore I have included some in my stir fry. If you disagree or simply don't like eggs, just omit them. It doesn't dramatically change the dish to exclude them, I just like eggs in my stir fries.

What You'll Need:
2 Tbs oil for cooking
2 cups cooked old rice, separated
1/4 tsp ginger
2 tsp minced garlic
2 tsp minced onions (dried or fresh)
2 Tbs sesame seeds (optional)
1 1/2 cups cut vegetables (I used broccoli, carrots, and peas, but you could also use bell peppers, mushrooms, onions, corn, or a frozen medley- whatever you prefer)
2 eggs, beaten
2 tablespoons low-sodium soy sauce
1 tsp sesame oil
freshly ground black pepper
The Process:
Heat the oil in your wok on medium heat. Add your ginger, garlic, minced onions, sesame seeds and cook for a few minutes until the onions are soft. Turn up the heat to high and add your vegetables. You want to add them one at a time, by which ones will take longer to cook. I added my broccoli first, then the carrots, then peas. That way your broccoli doesn't end up uncooked while your peas are overcooked.
Once your vegetables are almost tender, add the rice, soy sauce, sesame oil, and pepper. Heat on high until rice is heated through. Make a well in the center and pour in your eggs. Let cook through and then break it up and mix it in. Taste and add a little more soy sauce if necessary. Serve immediately.
December 9, 2011
Ode to My Sewing Machine
Oh Singer 2639, how good you have been to me. You were my first sewing machine, and we've been together a long time. It seems like yesterday I was just learning to quilt and you've been an integral part of every project I've worked on since- from mending to quilting to making my own clothes.
I didn't do the best job of taking care of you in the beginning (I didn't actually know you required occasional maintenance). Despite that, you've been a faithful workhorse for ten years, and I know you're tired. When you finally gave out, it was not a shock. I got more out of you than I ever hope to.
It is with a twinge of regret that I must retire you now. My sewing needs have changed so much since we first met that I cannot justify spending twice your purchase price to fix what's broken. RIP, my friend.
 |
| My simple but effective machine. |
It is with a twinge of regret that I must retire you now. My sewing needs have changed so much since we first met that I cannot justify spending twice your purchase price to fix what's broken. RIP, my friend.
December 1, 2011
3D Pinwheel Blocks Tutorial
I had a lightbulb moment a few days ago when I opened up the fat quarter bundle of Indian Summer fabrics I bought for the twin baby quilts. Initially, I wanted to use a charm pack, but I couldn't get the number of each pattern that I wanted with them, so I opted to just cut what I need from the fat quarters. They were all folded up and it occurred to me that instead of traditional pinwheels, I should do 3D ones!
In order to make these 3D pinwheels, you only need 8 fabric squares of any size you like. Mine all were 5"x5". If you use a charm pack, these blocks will fly together, because all the cutting is already finished! But, the larger your starting squares, the larger the block will be. My finished blocks were just over 9".
I decided to use the same background color for all the pinwheels, for the first quilt that is the pink. Next you want to pick 4 coordinating fabrics to be the pinwheels- I chose all different ones but you could do them all the same if you'd like.
You want to fold each piece in half, (corner to corner) press, and then fold them in half a second time and press to get small triangles.
I spent a good while just pressing all of the pinwheels for both quilts (there are lots of them). I like to watch TV shows while I sew, so I just popped in the first season of The Wire (It's the best television show ever made, bar none) and pressed triangles for a couple episodes.
 |
| The fabrics I'm using for these quilts- all but 5 in the collection |
I decided to use the same background color for all the pinwheels, for the first quilt that is the pink. Next you want to pick 4 coordinating fabrics to be the pinwheels- I chose all different ones but you could do them all the same if you'd like.
 |
| The pink floral is the background for all the pinwheels. |
 |
| Press them all in half (the circles are my ironing board) |
 |
| Then all in half again, to get small triangles. |
November 23, 2011
Thanksgiving Toffee Apple Dip
She's not a big fan of her cone (what a surprise) but she's stuck with it for a little while. She had a cherry eye that was taken care of before we picked her up, and she's got to keep the cone on so she doesn't scratch at her eye.
I was in charge of the snacks this year. I made the usual veggie and cheese platters, which are a huge hit with my family. But I saw a recipe not long ago that I knew I had to make as well. It's a caramel toffee fruit dip I found on Noble Pig. I may have been a bit hasty before when I suggested I knew the only fruit dip you'll ever need because this is pretty amazing. This one is definitely more geared towards apples, whereas the other dip is better suited for an assortment of fruits.

Caramel Toffee Fruit Dip
What You'll Need:
1 8 ounce package of cream cheese, room temp
3/4 cup brown sugar
1-1/2 teaspoons vanilla
1 teaspoon cinnamon
1/8 teaspoon nutmeg
1/2 a bag of Heath Bars, broken up into pieces
The Process:
Beat cream cheese, brown sugar, vanilla, cinnamon and nutmeg until smooth. Make sure the cream cheese is room temp, or it'll be harder to blend. Stir in Heath Bar bits and serve with some fruit of your choice. Granny Smith apples are what I'm taking to Thanksgiving because the slight tartness goes well with the sweetness of the dip.
Noble Pig's recipe has you use the Heath Toffee Bits which you find in the baking aisle, but somehow my grocery store didn't have any. So instead I picked up the small Heath Bars in the candy aisle. I smooshed the Heath Bars with my rubber mallet, which worked out well (and turned out to be a pretty good stress reliever, too).
I made this dip in less than ten minutes and it almost didn't make it to the party. I cut up one apple to try the dip- and the next thing I knew, the apple was gone and so was a bunch of the dip. Thankfully, I made a little extra. I bought the plastic container of cream cheese instead of the block in foil so I could put it right back into the container after it was made. It fit perfectly back into the container... but only because I had eaten an apple's worth.
I hope you all have a lovely and safe Thanksgiving! Happy travels, if you're traveling, as Hubby, Piper, and I will be. Don't kill yourselves falling into the trap of Black Friday sales tomorrow.
November 22, 2011
Vegetarian Chili With Butternut Squash
I'm sorry Meatless Monday is a little late, as you probably have noticed. However, I got a call from the vet early in the afternoon saying I could pick up my new dog early! I still had a lot to do before I picked her up, so even though I had all ready started dinner, I didn't get a chance to write up the post about it.

The original recipe came to me by way of the Twitter feed of Real Simple a few days ago. It's a slow cooker, which is the only reason I had dinner ready at all last night. They call for sweet potatoes, but I substituted butternut squash, since I still had enough of it left over. The squash was fine, but a little overdone, so I adjusted the recipe to compensate.
Vegetarian Chili
What You'll Need:
1 medium red onion, chopped
1 green pepper, chopped
4 garlic cloves, chopped
1 Tbs chili powder
1 Tbs ground red pepper
1 Tbs ground cumin
2 tsp unsweetened cocoa powder
1/4 tsp ground cinnamon
1 15.5 oz can stewed tomatoes (I ran it through the processor to break it up a bit)
1 15.5 oz can tomato soup
1 cup dried black beans, soaked, cooked and rinsed
1 cup dried kidney beans, soaked, cooked and rinsed
8 ounces butternut squash, cut into bite sized pieces
salt and black pepper to taste
Note on the beans: you can use canned beans if you want, one can of each, rinsed. 2 cups of dry beans (a pound bag) equals 4-5 cups cooked beans, depending on the type of bean. Therefore, 1 cup dry beans gives you approximately 1 can of cooked beans. Generally I get closer to 5 total out of a bag of kidney beans and black beans, but I like a little extra beans in my chili. I almost exclusively use dry beans nowadays, so the conversion is helpful.
The Process:
Soak your beans overnight if you can, or do a fast cook per the directions on the bag the day of. I did both beans together in the same pot, no problem.
Get your onions, pepper, garlic, spices, and a little olive oil and heat them over medium heat in a pan for a few minutes to get the flavors mingling. Deglaze the pan with a little of your tomato soup and add that plus everything but the squash into your slow cooker. Set on low for 7 hours. After the first hour, add in the squash. If you used sweet potato like the original recipe, definitely add it in with everything else.
Serve when the beans and squash are tender with a little grated cheddar cheese on top if you have any.
November 19, 2011
Welcome, Piper!
Hubby and I are about to welcome a new addition to the family- a beautiful beagle named Piper! We adopted her from the local shelter on Thursday, and she'll be coming home with us on Tuesday. She was found as a very skinny stray, with a chip that was never registered. She's a bit shy but incredibly sweet. It is such a shame that someone lost her, because she was obviously loved (and somewhat trained, too).
I grew up with a dog, (a wonderful American Cocker named Dante) and it's been strange living without one. Hubby finally agreed that it was OK for us to get one, although I don't think he anticipated the speed at which I would obtain one (took me all of a whole day to find this sweet girl). Things are really getting exciting here.
On an unrelated note, my mother was kind enough to mail me her sewing machine so I could start working on projects again. Yay! She doesn't sew as prolifically as I do, she mostly does small house projects and fixes clothes with it, so she said I could borrow it until I got a replacement. That means sewing projects are back on the table!
However, they will have to wait until after Thanksgiving, because I have a house to beagle-proof. Beagles aren't new to me, so I am pretty well aware of what I am in for (for better or worse). After the holiday though, I will have new recipes to share and an update on the pinwheel quilts I am making for two special little girls (sneak peek- I ordered that Riley Blake fabric).
 |
| Look at that tail blur! |
On an unrelated note, my mother was kind enough to mail me her sewing machine so I could start working on projects again. Yay! She doesn't sew as prolifically as I do, she mostly does small house projects and fixes clothes with it, so she said I could borrow it until I got a replacement. That means sewing projects are back on the table!
However, they will have to wait until after Thanksgiving, because I have a house to beagle-proof. Beagles aren't new to me, so I am pretty well aware of what I am in for (for better or worse). After the holiday though, I will have new recipes to share and an update on the pinwheel quilts I am making for two special little girls (sneak peek- I ordered that Riley Blake fabric).
November 14, 2011
Meatless Monday: Fall Pasta Primavera
It's been a while since I did anything special for Meatless Monday, so tonight I thought I'd step it up a notch and make this one a follow-along tutorial. Tonight, I made tri-colored pasta primavera with fall vegetables. Generally speaking, primavera is all about spring veggies, but it's Autumn so I thought I would give it a little fall twist. I found an acorn squash at the market today, and I knew it would be perfect.
Most primavera recipes call for chicken broth to form the body of the sauce, but since this is a Meatless Monday selection, I opted to use vegetable broth instead, and it worked out just as nicely.
Fall Pasta Primavera
Makes 4 servings
What You'll Need:
2 cups dried pasta of your choice
1 acorn squash
1 zucchini
1/2 butternut squash (I cheated and used pre-cut)
1/2 can vegetable broth
3 Tbs balsamic vinegar
2 garlic cloves, minced
2 Tbs minced dried shallots
1 Tbs crushed sage
1 Tbs crushed rosemary
1/2 cup grated Parmesan cheese
Cracked pepper and sea salt to taste
 |
| That basil? Pretend it's sage. I grabbed the wrong one for the photo. |
November 10, 2011
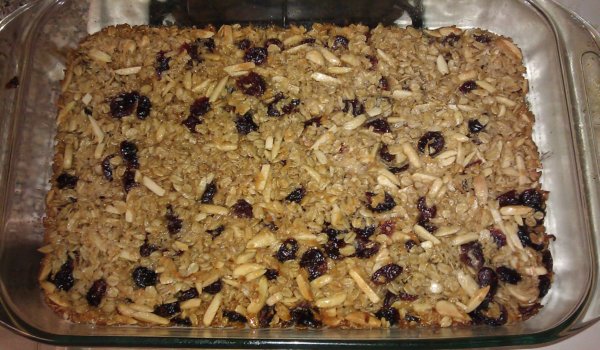
Cranberry Almond Granola Bars
I am a huge fan of granola bars, but I've been disappointed by the ones you buy in the store too many times. I thought it'd be fun to try and make my own. I like chewy granola bars, so it was perfect that I found this recipe on King Arthur Flour's website.
The nice thing about this recipe is that you can basically add any combination of goodies that you want as long as you have 2-3 cups total. I decided that I wanted a combination of dried cranberries, almond slivers, and flaked coconut. I got some excellent dried cranberries from my local Trader Joe's. I love that place. But you could add anything you'd like, including chocolate chips, peanuts, walnuts, raisins, blueberries, mini marshmallows... the list goes on. Use whatever strikes your fancy.
King Arthur Flour has you use their Sticky Bun Sugar, but I didn't have access to any on short notice. Instead, I used the substitute recipe they provided. I had a few problems though, the first of which was that the bars never really set. I even baked them for an extra 30 minutes. This may entirely be due to the replacement of the Sticky Bun Sugar, but I'd suggest using a little less liquid.
Chewy Granola Bars
What You'll Need:
1 2/3 cups quick rolled oats
1 cup + 2 tablespoons Sticky Bun Sugar
1/3 cup granulated sugar
1/3 cup oat flour (1/3 cup quick oats, processed till finely ground in a food processor)
1/2 teaspoon salt
1/4 teaspoon ground cinnamon
2 to 3 cups dried fruits and nuts
1 teaspoon vanilla extract
1/4 cup melted butter
1/4 cup honey or maple syrup
1 tablespoon water
 |
| It was nice and crispy on the edges, the best part. |
King Arthur Flour has you use their Sticky Bun Sugar, but I didn't have access to any on short notice. Instead, I used the substitute recipe they provided. I had a few problems though, the first of which was that the bars never really set. I even baked them for an extra 30 minutes. This may entirely be due to the replacement of the Sticky Bun Sugar, but I'd suggest using a little less liquid.
Chewy Granola Bars
What You'll Need:
1 2/3 cups quick rolled oats
1 cup + 2 tablespoons Sticky Bun Sugar
1/3 cup granulated sugar
1/3 cup oat flour (1/3 cup quick oats, processed till finely ground in a food processor)
1/2 teaspoon salt
1/4 teaspoon ground cinnamon
2 to 3 cups dried fruits and nuts
1 teaspoon vanilla extract
1/4 cup melted butter
1/4 cup honey or maple syrup
1 tablespoon water
November 7, 2011
Back and ready for action!
I'm officially hitched, back at home, and ready to jump back into the some blogging action. The weather was gorgeous, I got to see all my family again, and I just had such a wonderful time. But for now, I just wanted to share a photo from the day:

I got a lot of kitchen gadgets as wedding presents (thank you all so much!) so I have a ton of fancy new things to try, and I will be doing quite a few posts on them. I also have those Dark Elf Black Dragon photos that I promised, which will hopefully go up tomorrow.

I got a lot of kitchen gadgets as wedding presents (thank you all so much!) so I have a ton of fancy new things to try, and I will be doing quite a few posts on them. I also have those Dark Elf Black Dragon photos that I promised, which will hopefully go up tomorrow.
November 1, 2011
A Little Wedding Break
I'm heading up to New Jersey today to stay with my parents until the wedding, since there's lots to do, and I can't do it all from VA. Actually, when this post goes up I will all ready be on the road. Well, that assumes I will have gotten the car packed without forgetting anything important.
Things have just been so crazy here lately. Hubby-to-be has been contemplating a job change, which also entails a huge relocation, all the while I've been trying to get the wedding together. Because of the sewing machine snafu, I wasn't able to get some posts together to go up while I am busy doing the whole wedding thing. Sorry about that.
I'll be back in a week, and I have some cool things in store for when I get home. Just a teaser:

October 31, 2011
Happy Halloween!
The house is all decorated, and there's cinnamon, apples, and cloves in the air. It must be Halloween, the best of all the holidays. I'll be giving out candy to the neighborhood kids tonight. I've even already had a few trick-or-treaters. No tricks at my house tonight!
Larry the Pumpkin and I wish you a happy and safe Halloween!
 |
| Larry is a little dramatic. |
October 30, 2011
Beef and Beer Stew
It snowed yesterday, was in 20s overnight, and our heat is broken. This series of events called for some serious comforting, warm food. Queue an amazing recipe I've made a number of times by Not Quite Nigella. It is seriously fantastic, especially if you slow cook it. That's what I did this time, but it just depends on what I have going on during the day. Either way, though, this stew is wonderful.

The original recipe is in metric, but I have used it and tweaked it so many times that it's now in measurements more familiar to us weirdos who use inches and pounds.
Beef and Beer Stew with Dumplings
What You'll Need:
For Stew:
2 pounds beef cut into bite sized
2 onions, diced
2 garlic cloves, minced
3 tablespoons flour
2 cups beef stock
1, 12 oz bottle of beer*
3 bay leaves
1 Tbs brown sugar
2 Tbs Worcestershire sauce
pinch of salt, to taste
For the dumplings
1 cup flour
2 tsp baking powder
1/2 tsp salt
1/4 cup melted butter
2 eggs
1/2 cup grated cheese
October 25, 2011
So Yummy Vanilla Bean Crème Brûlée
When Hubby-to-be and I were first dating, we went to one of his favorite restaurants and their dessert special that night was vanilla bean crème brûlée. From that first bite, he and I both have been smitten with this delight. Unlike the Pumpkin Bread Pudding from a few days ago, crème brûlée can't be made on a whim unless you all ready have the necessary tools. I didn't- until now.
Hubby-to-be's wonderful mother sent us our wedding gifts early and to my indescribable joy, a set of ramekins and a cooking torch were among the gifts. It just so happens that also yesterday, Hubby-to-be was expecting a call about a job. I've been confident he would receive an offer, so I thought a crème brûlée would be a nice way to celebrate. And even if he didn't get it, there are worse things to cry over than tasty custard (but he did get it, it turns out).
 |
| Yum. |
October 21, 2011
Pumpkin Bread Pudding
This recipe for Pumpkin-Bourbon Bread Pudding popped up on my blogroll and I knew it had to be made. The best part? I already had all of the ingredients on hand! Now if that isn't a recipe that demands being made that instant, I don't know what is. You might be thinking that bread pudding isn't for you, but you'd be wrong. Try this and you'll be sold, just like I was.
I had never made a bread pudding before, so I didn't really stray from the given recipe. I simply left out the bourbon because I didn't have any. It turned out really well, so well that Hubby-to-be got into it before I could take a picture. It's so incredibly easy to make that anyone can do it.
Pumpkin Bread Pudding
from The Baker Chick
What You'll Need:
1 1/2 cups whole milk
1 cup canned pumpkin puree (not pumpkin pie mix)
1/2 cup sugar
2 large eggs plus 1 egg yolk
1/2 teaspoon salt
2 teaspoon ground cinnamon
1 teaspoon ground ginger
1/8 teaspoon ground allspice
Pinch of ground cloves
5 cups cubed crusty bread (like a baguette)
3/4 stick unsalted butter, melted
The Process:
Preheat your oven to 350°F. Combine all ingredients except butter and bread in a bowl and whisk together. In a separate and larger bowl, toss the bread cubes with butter until coated. Then pour the custard mixture over the bread and mix. Let it sit to soak it up for a few minutes. Then bake for 25-30 minutes, until the custard has set.
Then devour.
I had never made a bread pudding before, so I didn't really stray from the given recipe. I simply left out the bourbon because I didn't have any. It turned out really well, so well that Hubby-to-be got into it before I could take a picture. It's so incredibly easy to make that anyone can do it.
 |
| This was all that was left after Hubby-to-be came home. |
from The Baker Chick
What You'll Need:
1 1/2 cups whole milk
1 cup canned pumpkin puree (not pumpkin pie mix)
1/2 cup sugar
2 large eggs plus 1 egg yolk
1/2 teaspoon salt
2 teaspoon ground cinnamon
1 teaspoon ground ginger
1/8 teaspoon ground allspice
Pinch of ground cloves
5 cups cubed crusty bread (like a baguette)
3/4 stick unsalted butter, melted
The Process:
Preheat your oven to 350°F. Combine all ingredients except butter and bread in a bowl and whisk together. In a separate and larger bowl, toss the bread cubes with butter until coated. Then pour the custard mixture over the bread and mix. Let it sit to soak it up for a few minutes. Then bake for 25-30 minutes, until the custard has set.
Then devour.
October 19, 2011
No more sewing for me

I was so, so close to getting this Halloween quilt done. I have about 1/3 of it quilted. And now my machine is broken beyond my ability to repair. The nearest repair shop has over 10 reviews on Google saying "Don't ever go here" and the next closest one that can service my machine is over 50 miles away.
It doesn't look like I will be doing any sewing soon, since I can't exactly just go out and buy a new machine. So, for the foreseeable future it's just recipes from me. I was hoping to post a tutorial soon, but that's going to have to be put on hold as well. Maybe I can use this as an opportunity to work on some no-sew crafts I've been meaning to get around to.
October 16, 2011
Flynn Quilt Frame Review: The Sewing
As you may recall, I set up my Halloween circle quilt on the Flynn Multi-Frame back in September. Then I couldn't use it because my presser foot couldn't reach the floor. Over this past weekend, I took it back out and decided I could give the frame a try on my coffee table in the living room. It's low enough to the ground that I could turn the machine sideways and still have the foot reach the ground.
I couldn't be more disappointed. At first, I couldn't believe how cumbersome it all was jut to set up on my machine. In the instructional video, he makes it seem so easy, but there's serious a learning curve. After fighting to get it set up on my machine, I spent about 90 frustrating minutes trying to do a basic meandering pattern along the top border.
Despite the tension ribbons, which were very difficult to get in place, they didn't work as they were intended to. It was a 4" border I was working on, and I only got about an 8 inch long section of it done before I got tired of fussing with it. I took the quilt off the frame, put the frame pieces aside, and used a wash-away basting spray to hold the quilt sandwich together.
October 14, 2011
Inverse Quilts for Twins
I am so excited to get started on this one, even though the fabric-buying stage has to wait until after the wedding. A long-time friend of Hubby-to-be's and his wife are having twins in January. I just found out that they're expecting two girls- so you know what that means! It's time to start planning the quilts.
I think it's a little weird how many parents dress their young twins exactly the same. Same shirt, same pants, same hat, same shoes- it just rubs me the wrong way. But, that's what some people prefer. So not knowing the parents-to-be as well as Hubby-to-be, I decided to make the girls' quilts using the same fabric collection, but with the colors inversed. So the quilts will compliment each other, but they won't be exactly the same.
I have been thinking about doing a pinwheel quilt for some time, and I thought this would be a good opportunity to try it out. I found a really neat little page that lets you make a mock up quilt from the International Quilt Study Center & Museum. With my vague idea of pinwheels, I made a mock up, which you can see here in pink and brown. There were a surprising number of ways to customize the quilt. I made it 3 blocks by 4 blocks since it will be sized for infants, but you could scale it up even more.
I think pink and brown are cute but modern colors for girls that are better that the traditional pink, pink, and more pink that I've seen. I also don't know how the parents are planning to decorate, so I wanted something that would likely mix in with whatever they choose. After planning out my design ideas on the website, I decided I would need a collection with at least 12 fabrics with a variety of small-medium prints.
I spent most of the day searching, and I definitely found the perfect collection from Riley Blake, called Indian Summer.There are 23 prints, mostly in pink, brown, and cream. It's adorable, and the variety of prints is perfect for making the pinwheels. I can't wait to get started!
October 12, 2011
Dr. Pepper BBQ Pulled Chicken
Even though I am really into the autumn spirit, I'm not quite ready to let the summer go until I make one more barbeque dish. This one will really hit the spot on a chilly fall evening like tonight. I first came across Dr. Pepper BBQ sauces a while ago, they have been all the rage lately it seems.
The recipe I used for the sauce is adapted from Noble Pig, a blog I am so in love with.
Dr. Pepper BBQ Pulled Chicken
What You'll Need:
3 Tbs butter
3 garlic cloves, minced
1 medium onion, chopped
1 cup ketchup
1/2 cup apple cider vinegar
2/3 cup brown sugar
1/3 cup Worcestershire sauce
1 small can tomato paste
1 Tbs lemon juice
3 Tbs honey
2 tsp chile powder (use Chipotle or other for more hotness if you prefer)
1 tsp ground pepper
1 can Dr. Pepper
5-6 boneless, skinless chicken breasts
The Process:
Cook the onion and garlic in the butter to soften them. Whisk together remaining ingredients and bring to a simmer. If you're making the sauce ahead, simmer for 40 minutes until thickened. You can then store it in the refrigerator. If you're making the chicken that day, after you've simmered the ingredients together and they're well blended, you can just pour it straight into the crock pot.
Add in your chicken breasts to the pot. Make sure they are well coated and nearly covered with sauce. Cook on low for about 6 hours, or on high for 4 if you're in a hurry. If you cook it on high, you do risk burning the bottom chicken piece, so about halfway through you should rotate them.
I find that the chicken pulls apart better if it's been cooked longer on lower temp. Once they're cooked, grab two forks and pull the chicken apart. Mix the chicken pieces back into the pot with the sauce to coat them. Serve on toasted buns and enjoy!
October 10, 2011
Smitten with China Glaze
I can't get enough of Autumn this time around, and after I tried out the China Glaze polishes for the wedding, I obviously had to try and find some Halloween appropriate ones. They obliged me with an awesome glow-in-the-dark polish called Ghoulish Glow. I found a 4 polish Halloween set that included It's Alive glitter polish, the Ghoulish Glow, their Black Mesh Crackle, and a top coat.
This is what they look like all together. I applied the basecoat, the glitter polish, and the glow polish on top. I wasn't sure exactly how long to let those dry before I put the Crackle on, so I waited about 20 minutes. Then I applied the Crackle. I've never used it before, but I love, love, love it! The effect is fantastic and easy. The shatter effect started almost immediately. I let it dry for about 15 minutes before I sealed them with a top coat.
I love that it glows in the dark. The glow polish changed the effect of the glitter just a little so that it's a little duller. It doesn't have an effect on the over-all look, but I wouldn't use it over a polish that wasn't green. I had a little too much fun waving them around in the dark while they glowed. What a fun set!
 |
| Fierce! |
I love that it glows in the dark. The glow polish changed the effect of the glitter just a little so that it's a little duller. It doesn't have an effect on the over-all look, but I wouldn't use it over a polish that wasn't green. I had a little too much fun waving them around in the dark while they glowed. What a fun set!
October 5, 2011
China Glaze, where have you been alll my life?
A lot of the things for the wedding have been DIY projects; the favors, bouquets, menu cards, bridesmaid's alterations, ceremony programs, my garter, and most unexpectedly, the bustle for my dress. To save both myself and my bridesmaids a lot of last-minute money, I figured we would also do our own hair and makeup.
Unlike all the other DIY projects I've done for the wedding, I am no expert in either hair or makeup. I assume that I do a passably good job on my makeup based on compliments I've received, but that's about it. Hair, though, I know I am really out of my depth. I have naturally curly hair, so styling my hair is as simple as stepping out of the shower and letting it air dry. No surprise, I'm a little paranoid about the whole situation.
Cue China Glaze and their amazing nail polish. One of my lovely bridesmaids has been espousing the wonders of China Glaze polishes for ages, so I decided to buy a set to do French manicures for the wedding. As soon as I got them, I tried them out. They have this great clear polish called First and Last that is both the basecoat and the topcoat. Love it. I have been doing my own French manicures for years because I need to be professional for work, and this manicure came out so amazing.
It's been a couple days, and the manicure is still going strong. No chipping, no peeling, no yellowing. I don't think I can go back to any other polish after this. I seriously can't be happier. The only down side is that I cut my nails back before I bought the polish, so they look a little weird being so short. That's why I haven't included a photo.
October 3, 2011
Creamy Mac & Cheese
I love fall because it gives me an excuse to make this mac & cheese every week. I love it. It is also an awesome Meatless Monday recipe. I shamelessly stole the original recipe from Paula Deen, but I have made this one many times and after lots of tweaks it has become a completely different thing.
The big difference between my recipe and Paula's is that mine is baked. I tried it a number of times in the slow cooker, but it's just not the same. I really prefer the baked top with the breadcrumbs.
Creamy Mac and Cheese
What You'll Need:
1 box pasta, preferably rotini
1 10oz block of sharp cheddar cheese, grated
1/2 of a 10oz block medium cheddar cheese, or colby jack, grated
1 can cheddar cheese soup
2 cups milk
1/2 stick butter
1 tsp dry mustard (or two tsp liquid mustard)
1/2 tsp salt
dash of pepper to taste
breadcrumbs of your choice (plain, Italian, panko)
 |
| Look. At. That. |
Creamy Mac and Cheese
What You'll Need:
1 box pasta, preferably rotini
1 10oz block of sharp cheddar cheese, grated
1/2 of a 10oz block medium cheddar cheese, or colby jack, grated
1 can cheddar cheese soup
2 cups milk
1/2 stick butter
1 tsp dry mustard (or two tsp liquid mustard)
1/2 tsp salt
dash of pepper to taste
breadcrumbs of your choice (plain, Italian, panko)
September 30, 2011
Wedding Dress Blues
As I mentioned before, Hubby-to-be and I are tying the knot in just about a month. The big day is November 5th. So, not surprisingly, I have a thousand things to do. This week, one of those things was trying on my dress again. I wanted to make sure it still fit right, that it looked right, all that.
It has a corset-style back, and since Hubby-to-be isn't allowed to see it, I had to get creative to try it on while I was home alone. I laced the back up, tied a loose knot, slid it over my head, and then tightened the lacing up while it was one. It worked pretty well.
I thought the skirt looked kind of weird at the hips, like puffed out. But the train was spread out, so I took it off to bustle it up and see how the hips looked then. Then I discovered something surprising.
There. is. no. bustle.
But... but... the woman in the dress boutique bustled the sample dress for me in the shop. I saw it, and it was gorgeous. I did some looking into it on the internet, and it turns out I had to actually order the bustle on the dress, it's an upcharge. Uh, what? It has a 5 foot long train! I bought a dress from a respectable designer and the bustle doesn't come included with the dress?
After a little initial panicking, I realized I could just put in a French bustle without too much trouble. After a lot of pinning, trying on and taking off I finally got a two point bustle in place, and it looks really close to the one I saw on the sample dress. Best part, I can actually dance during the reception now! Woohoo!
Crisis averted, I now only have 999 things left to do.
September 22, 2011
Home Made Vanilla Extract
Fall has officially begun (according to the unseasonably cool weather I've had lately) and there is nothing so lovely as baking in the fall. Something that is critically important to a plethora of my favorite recipes is vanilla. I love cooking with vanilla beans, but they're not always right for baked goods.
For those fall favorites, you really need vanilla extract. Unfortunately, the fake stuff is, well, fake and the good stuff is frankly quite expensive. But I have a good solution for you- making your own! It's easy, inexpensive, and it tastes great (in your baked goods).

All you need is: vanilla beans, vodka, and a glass container. No joke. Well, those things and a good, sharp knife. I prefer to use amber glass bottles because I like the look, but you can use whatever glass bottle you like as long as it has a tight fitting cap.
What You'll Need:
3 vanilla beans
1 cup vodka (100 proof is ideal)
Glass container
The Process:
Slice your vanilla beans in half lengthwise. Put them into your bottle, cutting them in half if necessary to fit. Pour in your vodka and cap the bottle. Now put on your patient pants and wait. Give it a good shake once a week for about 2 months. Ideally, it should be stored in a dark place unless you used an amber glass bottle (sunlight is not good for it). After 2 months, it is ready to use and will last you for years if you top it off with a little more vodka after each use.
Vodka is typically used because it does not have a flavor that interferes with the flavor of the beans. However, you could use a rum if you want to have a little extra depth to your extract. I have a bottle of each, because vanilla rum extract (as I've dubbed it) doesn't work for all baked goods, but is really good in many cakes.
September 19, 2011
Red Lobster-Style Cheddar Biscuits
Being on a budget can be no fun at times. Hubby-to-be and I have a wedding to pay for in less than two months (I can't believe it's almost here), so we've been keeping a tight leash on our finances. That means eating out less, which is just as good for our budget as it is for our health a lot of times. However, every time I see a Red Lobster commercial, my mouth starts to water at the thought of those infamous Cheddar Bay Biscuits.
It came time to try and make my own. Ages ago I heard you could easily make your own using Bisquick mix, cheddar cheese, and garlic. This weekend I couldn't take it anymore and had to try to make some of my own. All told, they came out nearly as delicious as the originals, except I should have added more garlic. The recipe below includes the additional garlic.
Almost Cheddar Bay Biscuits
What you need:
2 cups Bisquick mix
2/3 cup milk (I used buttermilk because I had some leftover)
1/2 stick butter, cubed
2/3 cup shredded cheddar cheese
1/2 tsp ground garlic
It came time to try and make my own. Ages ago I heard you could easily make your own using Bisquick mix, cheddar cheese, and garlic. This weekend I couldn't take it anymore and had to try to make some of my own. All told, they came out nearly as delicious as the originals, except I should have added more garlic. The recipe below includes the additional garlic.
 |
| Tasty, tasty biscuits. |
What you need:
2 cups Bisquick mix
2/3 cup milk (I used buttermilk because I had some leftover)
1/2 stick butter, cubed
2/3 cup shredded cheddar cheese
1/2 tsp ground garlic
September 15, 2011
That Other Hobby
**Update** All miniature gaming and painting posts have been moved over to my new Warhammer-specific site, Chickhammer. Check it out for my latest hobby updates and news.
I mentioned before that I have another major hobby outside of my crafting and cooking. That hobby is a little thing called Warhammer 40,000. It will shortly be taking over my life. As I mentioned in a previous post it is a table top wargaming deal and it's pretty much my favorite game ever.
This is an expensive, time consuming, and male nerd dominated hobby
(insert rant about the rampant misogyny of nerd culture here). But,
Hubby-to-be loves it and I quickly realized that I do, too. I have another page called Chickhammer where I talk about all my Warhammer and miniature painting related things.
I mentioned before that I have another major hobby outside of my crafting and cooking. That hobby is a little thing called Warhammer 40,000. It will shortly be taking over my life. As I mentioned in a previous post it is a table top wargaming deal and it's pretty much my favorite game ever.
 |
| This is what I do when I'm not quilting. |
September 13, 2011
Butternut Squash Ravioli and Maple Cream Sauce
While the weather may not agree, I've decided it's now time for all things fall. Amid my mission for my usual Costco staples yesterday, I came across the most wonderful looking raviolis. Now, I will probably have to make these from scratch at some point, but I haven't made my own pasta before so I wasn't about to start with one that has a filling. I snapped these babies off the shelf as if they were the last ones in the world.
I was wondering what I would serve them with when I remembered that Hubby-to-be and I have decided to start a Meatless Monday campaign. There are myriad reasons people do meatless Mondays, but chief among them for us was meat is expensive and being healthier is something we both can use. And so, the raviolis became a meal unto themselves instead of a side dish.
I was wondering what I would serve them with when I remembered that Hubby-to-be and I have decided to start a Meatless Monday campaign. There are myriad reasons people do meatless Mondays, but chief among them for us was meat is expensive and being healthier is something we both can use. And so, the raviolis became a meal unto themselves instead of a side dish.
 |
| Be kind, this is my first food photo. |
September 12, 2011
Hubby's French Onion Soup
This weekend was Hubby-to-be's birthday. When I asked him what he wanted me to make for his birthday dinner, I got little more than a shrug in response. So I thought about foods he likes and liver and onions was the first thing that popped in my mind. Seriously. That really is his favorite. I have never made it because I've not seen a liver for sale that didn't look diseased. It doesn't help that I grew up hearing horror stories about liver and onions from my mother's youth.
Onions, though, I can work with. I remembered that one of Hubby-to-be's favorite foods also happens to be French Onion Soup. I scoured the internet for recipes and I found one from Simple Recipes that seemed perfect. I even had most of the ingredients on hand. My favorite part was that it used olive oil and not butter to cook down the onions, which makes it a bit healthier.
I also saw a lot of recipes that add a little flour to thicken it, but this one didn't and it is totally unnecessary. To give it a little more oomph, I added some Worcestershire sauce, because, well, I saw it when grabbing my bay leaf and I knew it would be a tasty addition. Lastly, I scaled it down a little since it's just the two of us.
Hubby's French Onion Soup
Serves 4
Adapted from Simple Recipes
What You'll Need:
3 medium yellow onions
1/4 teaspoon sugar
1 clove garlic, minced
6 cups beef stock (stock gives a better flavor than broth)
1/2 cup dry white wine (I used a chardonnay. You can also omit this if you prefer)
1 Tbs Worcestershire sauce
1 bay leaf
1/4 teaspoon of thyme (I had fresh thyme from my garden, but dry is fine, too)
French bread, sliced and toasted
1 cup grated Swiss Gruyere cheese
Onions, though, I can work with. I remembered that one of Hubby-to-be's favorite foods also happens to be French Onion Soup. I scoured the internet for recipes and I found one from Simple Recipes that seemed perfect. I even had most of the ingredients on hand. My favorite part was that it used olive oil and not butter to cook down the onions, which makes it a bit healthier.
 |
| Just the right amount of browned cheesiness. |
Hubby's French Onion Soup
Serves 4
Adapted from Simple Recipes
What You'll Need:
3 medium yellow onions
1/4 teaspoon sugar
1 clove garlic, minced
6 cups beef stock (stock gives a better flavor than broth)
1/2 cup dry white wine (I used a chardonnay. You can also omit this if you prefer)
1 Tbs Worcestershire sauce
1 bay leaf
1/4 teaspoon of thyme (I had fresh thyme from my garden, but dry is fine, too)
French bread, sliced and toasted
1 cup grated Swiss Gruyere cheese
September 9, 2011
Not So Fast, Flynn Quilt Frame!
I really thought it was time. I finished up my work, Hubby-to-be's car definitely didn't need a jump and I was going to quilt with my frame that I painstakingly set up this week. Then I was foiled by a technicality.
Take a closer look...
 | ||
| Something isn't quite right. |
September 8, 2011
Flynn Quilt Frame Review: The Set Up
I would first like to point out that I do enjoy the Flynn Multi-Frame. I really do. That being said, I do have some frustrations to vent out. It comes with 48" rods for you to roll your quilt, batting, and backing onto. That means you can put a quilt top up to 40" wide on it (there needs to be 4" to spare on either side). That Halloween quilt I wanted to put on it? It's 56" inches wide. So right off the bat, I had to buy new goodies for it.
After going to 3 different stores to find the conduit I needed, I had the appropriately sized rods. I bought double sided tape because I couldn't find any carpet tape, which is what the company recommends. I used some muslin from my stash to make the leader strips. The tape stuck to the rod, but not to the fabric. So I doubled down with some packing tape and secured the muslin with it. It took forever, but thankfully, I only have to do it once per set.
Then came rolling the backing onto the the rod. You're supposed to baste the backing to the muslin, then roll it up. Sounds simple enough, right? In order to get it rolled up nice and straight on the rod, I had to try and fail more times than I care to admit to openly. The company recommends rolling them up on the carpet. I don't, unless you don't have a choice (however, I do). The table results were much better.
 |
| Getting the top and batting rolled together was the easier part. |
September 7, 2011
Seascape Quilt, Part 2
I initially started this project to fill the empty wall in my apartment. Now that we actually moved, I intentionally left a blank wall in the living room for it. It'd be a shame to have it finished but no where to put it. I have the first major step completed, the top itself is now finished!
I'm really happy with how the colors seem to blend together on the right, not so much on the left. A lesson for next time. I think it will be a lot less noticeable once it has the sea critters on it. I am putting some jelly fish, an octopus, and some plant life on there for sure. I don't know exactly what else I will do yet. I have some interesting notions that I have been saving just for this. I'll just have to see what comes to me.
This one likely will not end up getting quilted once I'm finished with it. Once I appliqué the sea creatures and embroider the details, I will probably finish the edges and hang it up as-is. I'm not allowed to put any nails in the walls here, so a traditional quilt hanging method is out of the question. I am a fan of those 3M sticky tabs, and without the added weight of batting and backing, I've successfully hung smaller quilts that way previously. If that doesn't do the trick I might end up just using thumb tacks (gasp!). Maybe I don't want to go poking holes through my new piece of art.
 |
| Sorry it's a little blurry. |
I'm really happy with how the colors seem to blend together on the right, not so much on the left. A lesson for next time. I think it will be a lot less noticeable once it has the sea critters on it. I am putting some jelly fish, an octopus, and some plant life on there for sure. I don't know exactly what else I will do yet. I have some interesting notions that I have been saving just for this. I'll just have to see what comes to me.
This one likely will not end up getting quilted once I'm finished with it. Once I appliqué the sea creatures and embroider the details, I will probably finish the edges and hang it up as-is. I'm not allowed to put any nails in the walls here, so a traditional quilt hanging method is out of the question. I am a fan of those 3M sticky tabs, and without the added weight of batting and backing, I've successfully hung smaller quilts that way previously. If that doesn't do the trick I might end up just using thumb tacks (gasp!). Maybe I don't want to go poking holes through my new piece of art.
September 5, 2011
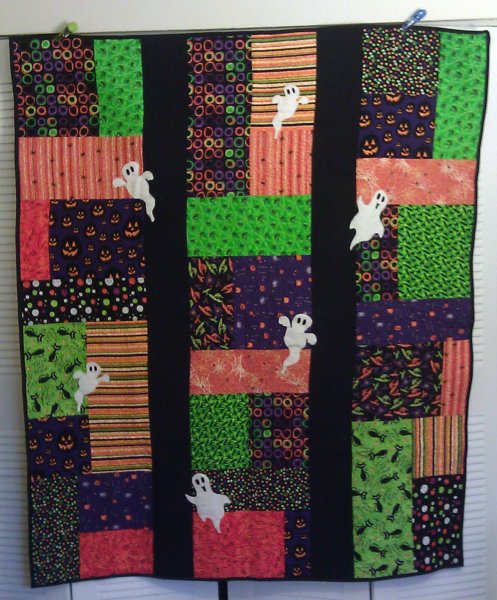
Halloween Circle Quilt
This little number has been hanging out in my stash since last September. On a whim, I bought a Moda Layer Cake from the Haunted Mansion collection. I had never experimented with the precuts before that, so I was really excited to try it out. I ended up having no idea what to do with it for a while. Then, I found a fabric with a concentric circles pattern on it, and the inspiration for this quilt was born.
 After assembling the blocks was as simple, but then I didn't know what to do with them. The black sashing is simple to make the Halloween prints really stand out. The border and backing are both from the collection, and I made the binding from one of the collection's prints, too.

September 1, 2011
The Most Wondeful Time of the Year (is almost here)
A lot of people dig the winter holidays most of all the year's celebrations. While I am certainly a fan (especially now that I celebrate both Christmas and Chanukah because of Hubby-to-be), neither are my favorite. Hands down, more than anything else, Halloween is the best holiday ever (for me). I loved it as a kid, I really loved it as a college student, and I love it still (and probably always will). There is something about dressing up, handing out candy, and all those messy spider webs that I just can't get enough of.
I usually have a day-long house decorating party (with myself) on October 1st to kick off the holiday. However, this year, I decided that if all the stores can start selling Halloween stuff in August, I can bring out a few of my favorite items a little early to enjoy them longer. One of my most favorite items is a new addition from last year: a Halloween quilt.

I usually have a day-long house decorating party (with myself) on October 1st to kick off the holiday. However, this year, I decided that if all the stores can start selling Halloween stuff in August, I can bring out a few of my favorite items a little early to enjoy them longer. One of my most favorite items is a new addition from last year: a Halloween quilt.
August 25, 2011
Studio Glamour Shots
I am so excited about having my own sewing space that I wanted to take a few more photos to share. It doesn't look like the novelty of having my own sewing space will wear off any time soon. Not that I'm complaining!
The stool is a new addition, too. I used to have a fold-up one, but it was cheap and broke (and almost took me out with it). One of these days, I will get around to making a chair pad to put on top of it. I think I want to do something along the lines of this pillow pouf, just with less fluff so it isn't too bulky. I think I can do one half of that pouf and staple it to the underside of the chair.
 |
| I think I need another spool holder. |
August 21, 2011
Have I Fallen off the Face of the Earth?
It's been a while, I know, but I most assuredly have not gone anywhere. Well, truth be told, Hubby-to-be and I moved house and that's why I haven't been putting up any new posts. I know it doesn't take 2 months to move, but between packing up and then unpacking, I am just not getting back into the swing of things. Everything has finally been unpacked, so I can start doing some projects again. And, I am getting back into them with my very own sewing studio. Here's where I'm going to gush a little about it.
Before now, my sewing space was along a wall in my living room. I didn't have anything together, and it was terrible to keep things organized. But, with the new place, I have an. entire. room. Well, if you ignore his own hobby space in there. It's a 60-40 split in my favor, so I can't complain. It's more space than I've ever had, and it's more space than I rightly know what to do with.
Before now, my sewing space was along a wall in my living room. I didn't have anything together, and it was terrible to keep things organized. But, with the new place, I have an. entire. room. Well, if you ignore his own hobby space in there. It's a 60-40 split in my favor, so I can't complain. It's more space than I've ever had, and it's more space than I rightly know what to do with.
 |
| It's a little messy, but it's all mine! |
July 9, 2011
Fool-Proof Creamy Rice Pudding
I love a good creamy rice pudding almost as much as I love Hubby-to-be (sorry, honey). There's just something about a wonderful rice pudding that just stops me in my tracks. This one puts me in the running against the one that his mother makes, and that's some steep competition.

I don't know for sure, but I believe she uses eggs in her recipe. I do not. There's two reasons for this: I don't think they're necessary for a good, creamy texture and when I was working out the recipe, I didn't actually have any eggs on hand. Thus, this recipe came to be. Necessity is the mother of invention after all.
Creamy Rice Pudding
makes 8 servings
What You'll Need:
1 cup uncooked rice (not instant rice)
2 3/4 cups milk
1/2 stick salted butter
2 vanilla beans (or 1 Tbs vanilla extract)
1 stick of cinnamon or 1 Tbs ground
1/2 cup sugar (more or less depending on the size of your sweet tooth)
1 pint cream
Pinch of salt
July 1, 2011
Homespun Honey Quilt, part 2
I've finally sat down and spent some time putting the top together. Lately, I've been a little too caught up in my other massively time-and-money-consuming hobby, Warhammer 40,000. It's a game you play on a 4'x6' mat with metal and plastic (and now resin) miniature models. You have an army of about 30-80 models, and your opponent has any army of their own and you battle.
It's about a hundred times more complicated than that, but it gives you an idea. There are several different armies you can choose from, and I've just switched from Chaos Daemons to Chaos Space Marines. That means I have about 60 models to glue together and paint. Most of them are assembled, but trying to paint them, and paint them well, is rather time consuming. Anyway, back to quilting.
The top is all but together, just have a few more strips to put together, although I haven't gotten to a photo yet. I'll get one eventually. It was just a matter of sitting down to do it. I am really happy with the way the arrangement of colors came out.
I stuck to the green/blue/red so it would have a more rustic vibe. I don't think Hubby-to-be will care, but it's more manly than the blue and white wedding ring quilt he uses now. I say he because we can't civilly share blankets. I like to bundle up in as many blankets as I can find (he calls me a burrito) and he likes to throw them on the floor. So, we use separate quilts so that we can actually comfortably sleep.
I will eventually load it up onto my Flynn Quilting Frame and quilting it up so that Hubby-to-be can use it once the weather turn colder.
June 30, 2011
Maryland Cream of Crab Soup
I have spent a lot of time in Maryland over my lifetime (lots of my family lives there). Therefore, I have a profound respect for the majesty of the Maryland Blue Crab and the devout culinary following it has inspired.
It's been hot as Hades out here lately, so soup of any stripe has pretty much been out of the question. But, I'm going to share it anyway because crab season is in full swing, and I just had to make it (or die thinking about it).

What You Need:
1/4 cup flour
1 stick (1/2 cup) salted butter (if you use unsalted, just add a little salt into the pot)
3 cups milk (I use skim because of all the cream)
1 quart heavy cream
3 Tbs. Old Bay seasoning (more or less to taste. I prefer more.)
1 Tbs. lemon juice
1/2 cup chopped shallots (I use dried which is instead 2 Tbs.)
1 pound lump backfin crab meat (don't use the imitation stuff)
Parsley and pepper to taste
June 23, 2011
Seascape Quilt, part I
I've been drooling all over art quilts for some time now. There are quite a few on display at one of my local quilt shops and they are something to behold. They use such interesting techniques and unusual mediums, from yarn, beads, yoyos, ribbons, you name it. I decided a while ago that I'd start one, so I drew up some ideas and decided that I wanted to do an underwater scene. I drew out the design and used my laptop to blow up the design to an appropriate size.
I want to use this quilt as a wall hanging to take up the dead space above the sofa. Hubby-to-be seemed skeptical of sea creatures in the living room, but I think it is an improvement over the Halloween Circle quilt that's currently up there, leftover from last year. I've been slowly collecting blue batiks for the background for a while, and I finally bought the last few on sale a few weeks ago. I printed out the pattern pieces and cut out the background pieces this week.
I want to use this quilt as a wall hanging to take up the dead space above the sofa. Hubby-to-be seemed skeptical of sea creatures in the living room, but I think it is an improvement over the Halloween Circle quilt that's currently up there, leftover from last year. I've been slowly collecting blue batiks for the background for a while, and I finally bought the last few on sale a few weeks ago. I printed out the pattern pieces and cut out the background pieces this week.
 |
| Gathered up and waiting to be cut |
June 17, 2011
Carrot Bundles? Yes, please!
I haven't had much time for sewing this week, but I have done a lot of cooking. Do you ever have trouble getting your kids to eat veggies? I don't have anyone underfoot, so it isn't a problem I've had. But I remember being one of those children, and we didn't have a dog I could sneak them to. I have the seriously most simple way for you to prep fresh vegetables that make them pretty tasty without adding anything, so they stay healthy, too.
Are you ready? Blanch 'em. Seriously. I never would have thought of it, and I bet you didn't either. My favorite vegetable to blanch is carrots, because it just softens them up a little but they still have a nice crunch. To blanch vegetables, all you need is to boil some water, drop your cut veggies into it for 2-4 minutes (depending on the thickness and how done you want them). I do not salt the water when I do this, but you can if you prefer.
I usually stop there, because I just pop them on a plate as a simple but tasty side dish. But, if you want to blanch them and make a little sauce to accompany them or grill them, then you need to dunk the newly blanched veggies in an ice bath to stop them from cooking further. I got the idea to bundle a few carrot sticks together from Paula Deen, who tied them together with some blanched chives (to soften them up enough for tying) and then dunked them into a skillet of butter, brown sugar, and white wine. The woman is overly fond of her butter for my taste, but she has some fantastic recipes and creative cooking ideas.
June 14, 2011
Homespun Honey Quilt
This is a project I started in late November of last year. I found a bunch of cute homespun fabrics on sale, and I knew I had a pattern for a scrappy homespun quilt somewhere at home. Particularly, a pattern that I thought my honey might like. Being the ambitious creature that I am, I thought I would have time to finish it before the medley of winter holidays (I celebrated Christmas growing up and Hubby-to-be celebrated Chanukah, so we do both now). No surprise that it didn't happen.
I managed to get all the strips cut out and sewn together before we left to spend Christmas with my parents, but the whole project got shelved because of holiday visits and then forgotten about during the new year. That was when I got my Etsy shop started, and those projects took precedence over all my other current projects. About a month ago I pulled the strip sets out and dusted them off and got to work on them again. Sadly, I had to iron them all over again (I will not being making the mistake of setting aside an ironed project in the future).
I managed to get all the strips cut out and sewn together before we left to spend Christmas with my parents, but the whole project got shelved because of holiday visits and then forgotten about during the new year. That was when I got my Etsy shop started, and those projects took precedence over all my other current projects. About a month ago I pulled the strip sets out and dusted them off and got to work on them again. Sadly, I had to iron them all over again (I will not being making the mistake of setting aside an ironed project in the future).
 |
| Lots of happy strip sets, freshly dusted and pressed |
June 11, 2011
New Crafts Soon!
This week has been a little hectic, so I wanted to assure you that I'll be posting up some new crafts soon. I've been working on a full-sized homespun quilt for Hubby-to-be and the mini quilt kit that I purchased from the Quilters Unlimited show. Sometimes I have so many projects going at once that none of them get finished at all.
And very soon a quilting surprise for me should arrive in the mail. I can't wait to test it out and finally see what it's like to use one myself. It should make my large quilting projects much easier. But I have to get the homespun quilt top finished first. As soon as I try it out, I will have a full report on it and if it's worth the pricetag.
And very soon a quilting surprise for me should arrive in the mail. I can't wait to test it out and finally see what it's like to use one myself. It should make my large quilting projects much easier. But I have to get the homespun quilt top finished first. As soon as I try it out, I will have a full report on it and if it's worth the pricetag.
June 4, 2011
Quilters Unlimited Aftermath
I had so much fun yesterday, and I certainly spent too much money. I met all sorts of nice vendors, and even ran into some I met at the previous quilting Expo in October.
My favorite demonstration was the first one of the day, "How to be a Charming Stripper" by Colleen Casey of Some Art Fabric. I am recently enamored with charm packs and jelly rolls, and this demonstration was all about helpful ways to be creative with these precut fabrics.
She utilized a special triangle template that I loved so much I had to buy one. Essentially, you sew your jelly roll strips together, let's say 4. You sew them together all around together to make a tube. Yes, a tube. Trust me, it's almost like magic when it's done. You line up the sewing line with the line on the template and cut a triangle. Then you flip it 180 degrees and cut again, repeating for the rest of the tube. The sewing line at the triangle's top point falls open because you cut most of the stitches away when you made the triangle. When you open them all up and put them together, you have a gorgeous square ready to be sewn together. Magic.
June 3, 2011
Quilters Unlimited Show
This weekend is the annual Quilters Unlimited show in Chantilly, VA. The event is run by a large, local quilt group and it is right down the road from me. I've also been interested in joining a quilting group, so this will give me a good opportunity to meet some of the people who run this one. Whenever I talk about quilters groups, I'm convinced Hubby-to-be hears "cult" instead of "group." But he does not understand. He doesn't get excited by rotary cutters, appliqué, or new fabric like I do. I can promise if I spent more time with a group of like-minded individuals (ones who ooh and ahh over new fabric lines), he'd be hearing a lot less of my craft-talk.
The Expo runs from Friday-Sunday, and it's only $10 to get in (or a weekend pass for $20). They are doing some demonstrations just about every hour, and there are ones I want to check out on each of the days. It wouldn't be an Expo without oodles of vendors, and I can't wait to see what they'll have on display. There are vendors from all over the country, but also quite a few from my local area. A few of my favorite shops will be there, as well as some that are close by, but not close enough to just visit on a whim.
I had better get going now, the show opens up at 10 today and I have a lot I'd like to see!
Subscribe to:
Posts (Atom)