I usually have 2-3 projects that I'm working on at once, but sometimes (like now) I get a little carried away and it turns into 5-6. That's when I know it's time to pick up the most complete project and put the finishing touches on it.
For about two weeks, this quilt had been sandwiched and
half quilted. The binding was even already pressed. So I had no excuse
not to sit down for a couple hours and finish up the quilting. Of course, I also had a deadline to finish it by- the baby shower!
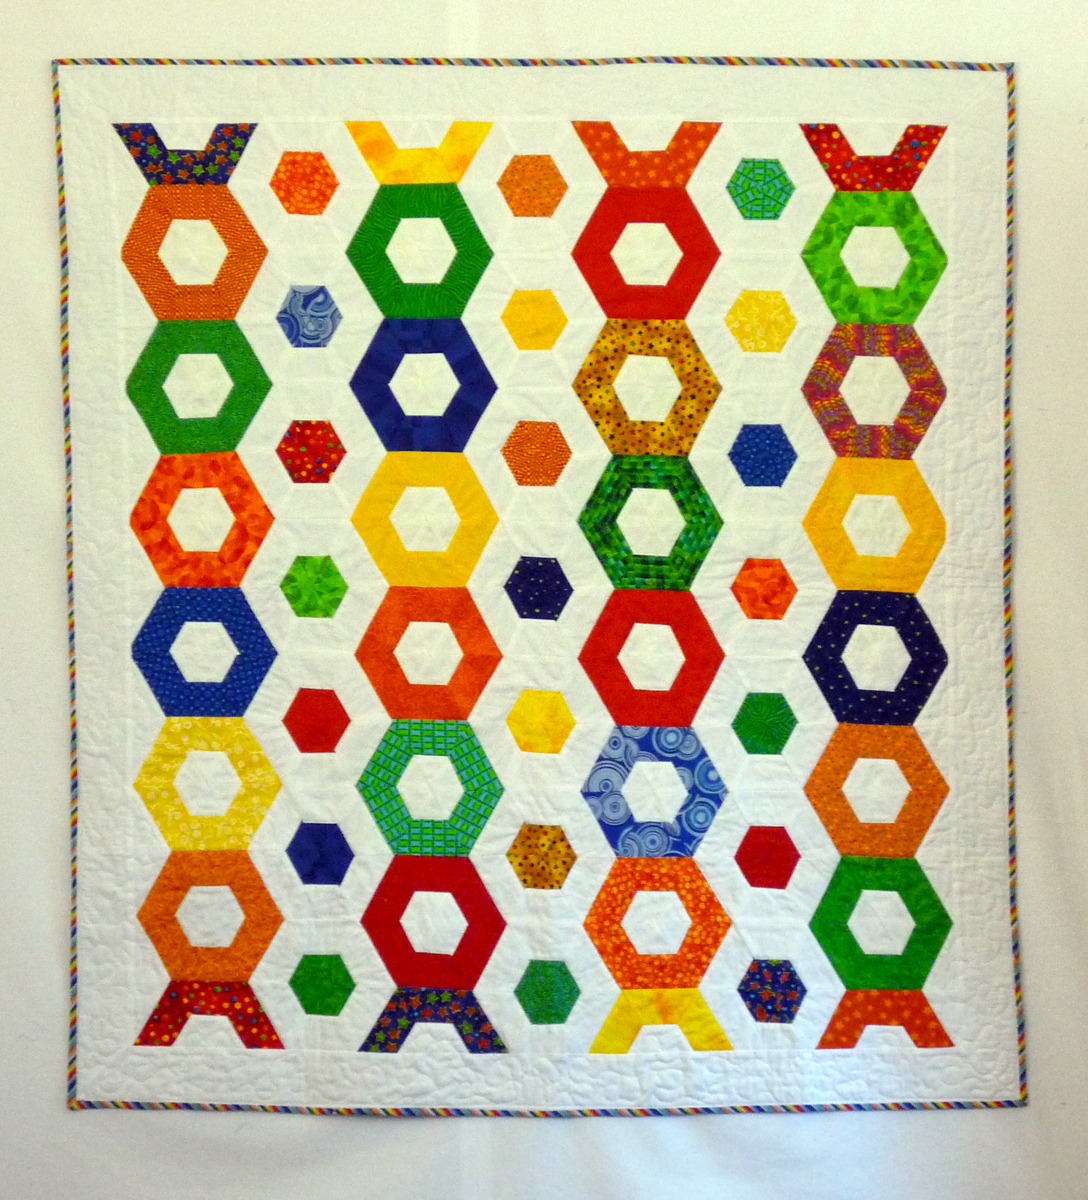
I'm very happy with how it turned out. It's my first time making a pattern like this, and I was worried that the corners of the hexagons wouldn't match up. For the most part, though, they matched up very well, it's only a few spots that are noticeably off. I did rip and restitch a few of them that were really bad.
The colors worked together far better than I had thought they would. I had a hard time finding enough bright reds and blues to fill out the quilt, but for the most part, all the colored fabric came from my stash. The white background, as it happens, came from my stash, too. A while ago there was a nice white quilting cotton on clearance, so I bought the whole bolt for almost nothing.
Choosing the binding was possibly the most difficult part. I couldn't find anything that I liked. I ultimately ended up with this stripe because it closely matched the tone of the prints. And I really do love cutting bias binding from a straight stripe pattern and ending up with diagonally striped binding. You can't go wrong with it.
The backing I bought after the top was finished. I wasn't sure which color would have the right feel until the top was finished. I brought it with me to the fabric store to hold it up against several colors. There was also a red that I liked, but ultimately, I went with this blue dot print because it looked better with the binding than the red did.
I really enjoy making quilts, but even better is when I give them away. Here's the happy mama-to-be! I'm endlessly excited for my aunt and uncle- this is their first little one!
Now, only 4-5 more projects are on my quilting table. Time to finish a few of them up! I just started attending classes at night, after a year or so of thinking about it, and obviously my quilting time has diminished. But I have several almost-done quilts that won't take too long to sew up if I dedicate a few Saturday mornings to the effort.
Showing posts with label baby. Show all posts
May 25, 2013
February 26, 2013
Little Hexie Quilt WIP
Lately I've been working pretty furiously on a really cute quilt. How I found the pattern is an interesting story. One of the quilting magazines I follow posted an image of a hexagon quilt, discussing the quilting on it but not the pattern. I asked if they had it, and another woman who follows it responded with step by step instructions on how to make it! I am so thankful to her for that kindness.
So far, I have the top quilt nearly entirely together. You see some horizontal lines going across the colored hexegons? That's because instead of sewing the whole hexagons together and doing y-seams (pain in the butt), you stitch half a hexagon to the one above it, making long strips which you then sew together to make the whole top. Isn't that clever?
I had a few 2" strips laying around from a UFO and I took two, stitched them together, and used them to test out the instructions the woman gave me. It worked like a charm, and the test block turned out to be pretty cool.
The fun thing about this pattern is that depending on how to sew the blocks together, you can get a completely different looking quilt. For the test piece, I simply cut 6 triangles out, flipping my 60 degree ruler as I went and then stitched them all together, alternating center colors. I will definitely be doing a tutorial for this quilt after I've finished it up.
The Little Hexie uses white as one strip for all of them, and I cut enough triangles from each color set to end up with 12. That allowed me to make two hexagons from each strip set, one with the color on the outside, and one with it on the inside like this:
The color combinations and placement choices are practically endless here. I was so inspired by the purple and black test quilt, that I decided to make one for myself using that color scheme. The bright and colorful Little Hexie quilt is being made as a gift.
So far, I have the top quilt nearly entirely together. You see some horizontal lines going across the colored hexegons? That's because instead of sewing the whole hexagons together and doing y-seams (pain in the butt), you stitch half a hexagon to the one above it, making long strips which you then sew together to make the whole top. Isn't that clever?
I had a few 2" strips laying around from a UFO and I took two, stitched them together, and used them to test out the instructions the woman gave me. It worked like a charm, and the test block turned out to be pretty cool.
The fun thing about this pattern is that depending on how to sew the blocks together, you can get a completely different looking quilt. For the test piece, I simply cut 6 triangles out, flipping my 60 degree ruler as I went and then stitched them all together, alternating center colors. I will definitely be doing a tutorial for this quilt after I've finished it up.
The Little Hexie uses white as one strip for all of them, and I cut enough triangles from each color set to end up with 12. That allowed me to make two hexagons from each strip set, one with the color on the outside, and one with it on the inside like this:
![]() |
| Inverses! |
January 25, 2012
3D Inverse Pinwheel Quilts!
It took me a little longer to finish these quilts than I had intended, largely because I wasted so much time waiting for the fabric to arrive. I wasn't able to find it in my local quilt shops (I think I waited too long to look), so I had to order it online and apparently they shipped it from the moon.
This is the one I finished first. I used a thin batting, since they're being shipped off to Hawaii tomorrow.
I used the stripe print for the binding on both. I tried out a new method to make the binding, and it really worked well. I think I'll do a little tutorial on it soon.
![]() |
| Pink background. |
![]() |
| Brown background. |
October 14, 2011
Inverse Quilts for Twins
I am so excited to get started on this one, even though the fabric-buying stage has to wait until after the wedding. A long-time friend of Hubby-to-be's and his wife are having twins in January. I just found out that they're expecting two girls- so you know what that means! It's time to start planning the quilts.
I think it's a little weird how many parents dress their young twins exactly the same. Same shirt, same pants, same hat, same shoes- it just rubs me the wrong way. But, that's what some people prefer. So not knowing the parents-to-be as well as Hubby-to-be, I decided to make the girls' quilts using the same fabric collection, but with the colors inversed. So the quilts will compliment each other, but they won't be exactly the same.
I have been thinking about doing a pinwheel quilt for some time, and I thought this would be a good opportunity to try it out. I found a really neat little page that lets you make a mock up quilt from the International Quilt Study Center & Museum. With my vague idea of pinwheels, I made a mock up, which you can see here in pink and brown. There were a surprising number of ways to customize the quilt. I made it 3 blocks by 4 blocks since it will be sized for infants, but you could scale it up even more.
I think pink and brown are cute but modern colors for girls that are better that the traditional pink, pink, and more pink that I've seen. I also don't know how the parents are planning to decorate, so I wanted something that would likely mix in with whatever they choose. After planning out my design ideas on the website, I decided I would need a collection with at least 12 fabrics with a variety of small-medium prints.
I spent most of the day searching, and I definitely found the perfect collection from Riley Blake, called Indian Summer.There are 23 prints, mostly in pink, brown, and cream. It's adorable, and the variety of prints is perfect for making the pinwheels. I can't wait to get started!
Subscribe to:
Comments (Atom)


