May 25, 2013

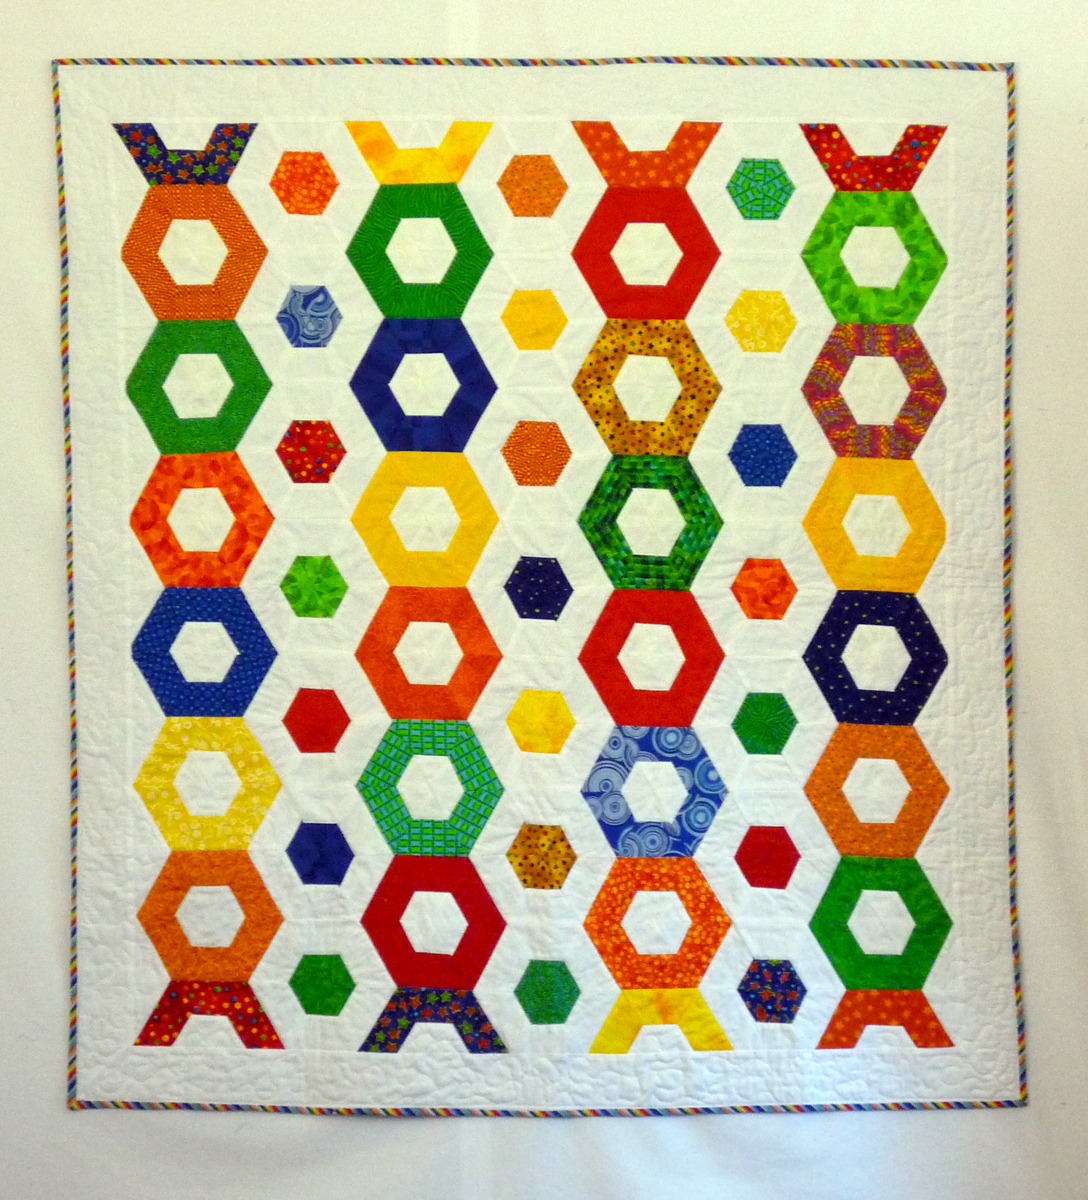
Little Hexie Quilt All Stitched Up!

I usually have 2-3 projects that I'm working on at once, but sometimes (like now) I get a little carried away and it turns into 5-6. That's when I know it's time to pick up the most complete project and put the finishing touches on it.


For about two weeks, this quilt had been sandwiched and half quilted. The binding was even already pressed. So I had no excuse not to sit down for a couple hours and finish up the quilting. Of course, I also had a deadline to finish it by- the baby shower!


I'm very happy with how it turned out. It's my first time making a pattern like this, and I was worried that the corners of the hexagons wouldn't match up. For the most part, though, they matched up very well, it's only a few spots that are noticeably off. I did rip and restitch a few of them that were really bad.


The colors worked together far better than I had thought they would. I had a hard time finding enough bright reds and blues to fill out the quilt, but for the most part, all the colored fabric came from my stash. The white background, as it happens, came from my stash, too. A while ago there was a nice white quilting cotton on clearance, so I bought the whole bolt for almost nothing.


Choosing the binding was possibly the most difficult part. I couldn't find anything that I liked. I ultimately ended up with this stripe because it closely matched the tone of the prints. And I really do love cutting bias binding from a straight stripe pattern and ending up with diagonally striped binding. You can't go wrong with it.


The backing I bought after the top was finished. I wasn't sure which color would have the right feel until the top was finished. I brought it with me to the fabric store to hold it up against several colors. There was also a red that I liked, but ultimately, I went with this blue dot print because it looked better with the binding than the red did.

I really enjoy making quilts, but even better is when I give them away.  Here's the happy mama-to-be! I'm endlessly excited for my aunt and uncle- this is their first little one!


Now, only 4-5 more projects are on my quilting table. Time to finish a few of them up! I just started attending classes at night, after a year or so of thinking about it, and obviously my quilting time has diminished. But I have several almost-done quilts that won't take too long to sew up if I dedicate a few Saturday mornings to the effort.

May 17, 2013

Amaretto Pound Cake Perfection

While at my Trader Joe's recently, I came across this interesting carton of shelf stable whipping cream. I always seem to want whipping cream, but rarely have it on hand. For under $2, I thought it was worth giving it a try. But then, like magic, all my whipping cream needs vanished. I started stumbling around the internet, looking for interesting and creative uses of whipping cream.

Instead, I accidentally came across this pound cake recipe that says it was a favorite of Elvis Presley's and it looked too good not to try. People say a lot of things about famous people like that, but after having tasted it? Total truth, my friends. It must be. This cake is too good to be a lie.


I made a few small modifications to the recipe and it turned out beautifully. The originally recipe called for 7 eggs and that just seemed like far too many. Plus, I only had 6 on hand the first time I made it. The texture turned out great anyway, so I've been sticking with 6. I also added some amaretto, because all baked goods are better with a little booze.

What You'll Need:
3 cups sugar
2 sticks of butter, softened
6 eggs
3 cups cake flour, sifted OR make the DIY cake flour (see below)
1 pint whipping heavy cream
2 teaspoons vanilla extract
1/4 cup amaretto liquor (optional, but amazing)

DIY Cake Flour:
You'll need all-purpose flour, cornstarch, two medium bowls, and a mesh strainer (or flour sifter)

Take out a 1 cup measuring cup. Put two tablespoons of cornstarch in the measuring cup. Add all-purpose flour on top until the measuring cup is full. Dump it out into a bowl. Repeat twice and you'll have the correct amount of flour for this recipe. Put your strainer over the second bowl, and slowly add the flour/cornstarch mixture to the strainer as you shake it back and forth, which both sifts the flour and mixes the flour and cornstarch together. And voliĆ ! An excellent cake flour substitute.

April 18, 2013

Homemade Garlic Butter and Toast Recipe

I've known about the deliciousness of making garlic butter at home, but it wasn't until recently that I tried it myself. I don't know what took me so long, it's delicious and simple to make!


There are so many uses for garlic butter, chief among them for me is garlic bread. But you can also use it on baked potatoes, to saute shrimp, to make croutons, over steamed vegetables, on steak or an endless amount of other ways. I certainly haven't thought of them all.

What You'll Need:
1 stick softened, salted butter (not melted!)
2 cloves minced garlic
1 tsp Italian herb seasoning

The Process:
Make sure your butter is well softened. With the warm days I've been having, it didn't take long. Mix all ingredients in a small bowl with a fork until well combined. You can use it immediately, but the flavors enhance after it's been mixed a while. I like to line the top half of my butter dish with cling wrap, scoop the garlic butter into it, and chill it in the fridge. After it has hardened, you can pop it right out of the dish and it's stick-shaped and ready for slicing.

You should store it in your refrigerator. It keeps for quite a while, just like regular butter.

My #1 use for it is to make ridiculously good garlic bread. I've been slicing up a baguette, buttering up a few slices, and toasting them in my toaster oven at 400 degrees for 5-6 minutes. That's plenty for just my husband and I to enjoy... or to just make as a snack. For superior garlic bread, use a sourdough loaf.


However, if you're feeding a crowd, you can do it in the oven. Slice the baguette, but without cutting through all the way to the bottom- leaving about 1/2 an inch attached. In each slit, place a generous pat of garlic butter. Wrap the whole loaf loosely in tin foil and bake at 250 degrees for 8-10 minutes.

All this talk of garlic bread is making my hungry for some spaghetti and meatballs. Looks like I know what I'll be making for dinner!

March 25, 2013

Duct Tape Dressform Blues

Over the weekend, a friend threw a duct tape dressform making party. If you haven't heard of the duct tape dress form, it's a really cool and cheap alternative to buying one of those more expensive adjustable dress forms. You put on an old shirt, have a friend wrap you up in duct tape, cut the tape/shirt off, seal it up, stuff it with fluff, and voila! An easy double of you.

But it isn't pretty.
It sounded like a fabulous idea. My friend bought all the duct tape and fiber fill in bulk so we could save money and a good time was had by all during the event. About twelve of us participated, we took turns wrapping each other and in the middle, we took a nice tea and cookies break.

But when I got home, I took out my measuring tape and measured my new "me". And it was off. Horribly, horribly off. In some places it was more than 5" too large. I was aghast, but I figured I could still salvage it. I took off the bottom, pulled out all the stuffing, and stored it in two garbage bags for safe keeping until later.

I recut the seam in the back, and cut two princess seams up the front so I could take it in as best I could. After about two hours of cutting, taping, measuring, retaping, measuring, and retaping again, I finally got the form to roughly where it should have been in the first place. Then I ran out of duct tape before I could finish it up.

I went out to get some more, but they only had a black kind that was more expensive. I bought it anyway, but I was feel pretty frustrated by the project so I decided to call it a day and do other things. I woke up this morning, however, to discover that all the seams I painstakingly cut, measured, nipped and tucked had all busted open in the night. I didn't have enough tape to reinforce them completely, so they all popped in the night.

So, I had to tape everything back together again (that's the black tape you see in the image). But somehow, it didn't fit back together the same way. The underbust is too big (I couldn't fit the bra I'm wearing right now on it and I could before) and there's a weird thing going on in the space between my breasts and the neck. It's sort of popping out in a strange way. I remain confident that my actual chest/neck area doesn't do that, but I don't know what to do about it.

I'm strongly considering taking all the fluff out of it again and ditching this entire one and starting over. But that would be a lot of time and a lot of tape, with no guarantee that it'll come out better the second time. For now, I'm too frustrated to even look at it so I'm just going to let it sit for a few days while I figure out what I want to do next.

March 18, 2013

Guinness Pot Roast

 Nothing says St. Patrick's Day quite like putting beer in all your food. I just opted to add it to my main dish, as I wanted to reserve some of my Guinness for drinking. I decided on a pot roast, since Costco had a good deal on a pair of them recently, I had one handy.

 
It's a fun St. Patty's Day twist on the usual slow cooker roast. Instead of just beef broth, you add a bottle of Guinness to the cooking liquid. If you don't have any Guinness on hand, you could certainly substitute any beer you like, but I would stick with dark beers like stouts and porters for their strong flavor.

For some crazy reason, it's still winter here around DC, despite being March. I intended to make this pot roast for St. Patrick's Day, regardless of what silliness the weather had in store. However, the clouds spent the better part of the morning dropping snow on us, so now the leftovers will make a nice hot lunch on this snowy afternoon.

Guinness Pot Roast
makes 4-6 servings, depending on roast size

What You'll Need:
2-3lb pot roast
small onion, chopped
2 cloves garlic, minced
3 carrots, sliced
1 lb of small red potatoes, halved
12oz Guinness beer
2 cups beef broth, low sodium if possible
1 package onion soup mix
2 tsp thyme
2 Tbs coarse salt
2 Tbs cracked pepper
2 bay leaves

The Process:
   Heat up a skillet on medium heat with some olive oil and let it get nice and hot. Combine the coarse salt and pepper in a bowl and then rub the mixture over the surface of the roast. Sear each side of the roast for 3-4 minutes per side. Place into the crock.

   In the same skillet, cook your onions for 5-6 minutes until soft and then add the garlic. Cook for an additional 3-4 minutes. Make sure to scrape the bottom for the burned bits from the roast. Add to the crock along with the carrots and potatoes.

   Put the onion soup mix, thyme, and bay leaves into the crock. Add the Guinness and beef broth over top and mix it up to combine the onion soup mix. The roast and vegetables should be almost completely covered. If not, add a little more broth or water. Cover the crock and cook on low for 6-7 hours, until the roast is fork tender and the potatoes are soft. Remove roast from the crock and let it rest, tented with foil, for 10-15 minutes before carving.

   If you prefer a thick broth, as I do, remove 2 cups of liquid from the crock and thicken it in your preferred method. I use arrowroot starch, but cornstarch or flour work just fine. Stir the thickened liquid back in with the rest of the liquid and vegetables while the roast is resting. Carve the roast, spoon vegetables and broth onto your plate, and serve.

   Don't forget to have some bread on hand to sop up the broth on your plate!

March 17, 2013

Feeling Lucky: A St. Patrick's Day Mini Quilt

In the spirit of the holiday, I made a little luck charm for my house- a four leaf clover mini quilt!


As with the other mini quilts, it took just an afternoon to make. That's my favorite part about them. You start with your uncut fabric and thread and just a few hours later you have a finished product. It's a lovely break from working on the bigger and longer quilting projects.

I really enjoy St. Patrick's Day, as it gives me a good excuse to wear green and make some excellent potato-laden foods. In the crock pot right now is a pot roast with carrots and potatoes, but instead of using all beef broth, the liquid is part Guinness! I'm quite looking forward to the results this evening. If it's good, I'll post a recipe to follow.

Have a lovely day, and if you're going out to raise a pint to Ireland, please be safe!

February 26, 2013

Little Hexie Quilt WIP

Lately I've been working pretty furiously on a really cute quilt. How I found the pattern is an interesting story. One of the quilting magazines I follow posted an image of a hexagon quilt, discussing the quilting on it but not the pattern. I asked if they had it, and another woman who follows it responded with step by step instructions on how to make it! I am so thankful to her for that kindness.


So far, I have the top quilt nearly entirely together. You see some horizontal lines going across the colored hexegons? That's because instead of sewing the whole hexagons together and doing y-seams (pain in the butt), you stitch half a hexagon to the one above it, making long strips which you then sew together to make the whole top. Isn't that clever?

I had a few 2" strips laying around from a UFO and I took two, stitched them together, and used them to test out the instructions the woman gave me. It worked like a charm, and the test block turned out to be pretty cool.


The fun thing about this pattern is that depending on how to sew the blocks together, you can get a completely different looking quilt. For the test piece, I simply cut 6 triangles out, flipping my 60 degree ruler as I went and then stitched them all together, alternating center colors. I will definitely be doing a tutorial for this quilt after I've finished it up.

The Little Hexie uses white as one strip for all of them, and I cut enough triangles from each color set to end up with 12. That allowed me to make two hexagons from each strip set, one with the color on the outside, and one with it on the inside like this:

Inverses!
The color combinations and placement choices are practically endless here. I was so inspired by the purple and black test quilt, that I decided to make one for myself using that color scheme. The bright and colorful Little Hexie quilt is being made as a gift.

February 19, 2013

My First Brew- the Very Heffelberry!

For Christmas, my father (who has been brewing up a storm in the past year) gifted me a brewing kit to make my very own beer. We brewed it while I was home, and it was just finally finished. I shared it with several friends this weekend because it was ready for the big reveal.


The beer he bought was a Bavarian hefeweizen, because I really enjoy the wheat beers. But, we added a special ingredient and that's why it's such an especially dark wheat beer. We added Elderberries! (insert Monty Python joke of choice here).

The ingredients!
 We were lucky to find the elderberries at a local home brew supply shop, but everything else we needed came from the kit. Dad was cool enough to give me the kit a little early so we actually brewed the beer on Christmas Eve because I was already up visiting for the holiday.

February 6, 2013

Apple Cider Steel Cut Oats

January was a bit of a bust, productivity-wise. I was sick for most of the month and it's a busy season for my job. I did as little cooking as possible, and no sewing whatsoever. But I'm finally feeling better and things have calmed down, so things are back on track with a new steel cut oats recipe.

I love this one because it combines two of my favorite cold weather things- apple cider and steel cut oats. The original recipe is from Bob's Red Mill (who's products I love) but I changed it around to suit my tastes more. I used spiced cider instead of regular to give it a little extra oomph.


Apple Cider Steel Cut Oats
makes 4 servings

What You'll Need:
3 cups spiced apple cider
1 cup steel cut oats
2 Tbs packed brown sugar
1/2 tsp cinnamon
1/4 tsp all spice
1/4 tsp salt
1 small-medium apple, diced
1/4 cup chopped walnuts

The Process:
Combine the cider, sugar, and spices in a pot and bring to a boil. Add the oats, diced apple, and walnuts. Cover and reduce to a simmer. Simmer for 25-30 minutes, stirring occasionally. Serve and enjoy.

Leftovers can be refrigerated and reheated in the microwave. Just add a little water to the oatmeal before microwaving it.


With all the snowy days we've had lately, this has been my favorite way to start the day. Hopefully, though, we don't get too much snow. So far we've been lucky, the majority of the snows coming through the area have missed us.

January 2, 2013

Blue and Grey Mod Table Runner

Back in the fall, my mom asked me if I could make her a table runner and matching table topper to go on the buffet table and kitchen table she has in the kitchen. She wanted something for everyday use that matched the colors there but couldn't find anything ready-made. A phone call and a few notes later, I had a good idea of what she was looking for. The result:


I started with a free pattern from All People Quilt that had the basic pattern I liked, but in the wrong proportions and relied on a specific fussy cut fabric to create the interesting effects in the middle of the block. I made it in a totally different size to fit the proportions my mom wanted and I left off the triangles at the end to make the ends pointed (as requested).

 
For the center of the blocks, instead of fussy cutting fabric, I actually appliqued some crazy cut fabrics onto the teal backing fabric. I took my 5" square ruler and just sort of made a medium crazy rectangle and a small crazy rectangle.


I used a single block to make the table topper for the kitchen table. All the Christmas decorations were still out when I left, so I didn't get a chance to see them in action. Mom promised to send me a photo of them 'in the wild' once the decorations get put away.
Related Posts Plugin for WordPress, Blogger...