December 12, 2011

Vegetable Stir Fry

We meet again, Monday. I have got a tasty recipe for today's venture into vegetarianism. It's a simple fried rice recipe that cooks up quick and is nice and comforting.

You don't need a wok for this recipe, but it helps, and no matter what you want your pan to be very hot when you add the rice. You also don't have to use sesame seed oil, but it gives it a little extra depth that I like.

Now, I am of the opinion that eggs are not meat, therefore I have included some in my stir fry. If you disagree or simply don't like eggs, just omit them. It doesn't dramatically change the dish to exclude them, I just like eggs in my stir fries.


What You'll Need:
2 Tbs oil for cooking
2 cups cooked old rice, separated
1/4 tsp ginger
2 tsp minced garlic
2 tsp minced onions (dried or fresh)
2 Tbs sesame seeds (optional)
1 1/2 cups cut vegetables (I used broccoli, carrots, and peas, but you could also use bell peppers, mushrooms, onions, corn, or a frozen medley- whatever you prefer)
2 eggs, beaten
2 tablespoons low-sodium soy sauce
1 tsp sesame oil
freshly ground black pepper

The Process:
Heat the oil in your wok on medium heat. Add your ginger, garlic, minced onions, sesame seeds and cook for a few minutes until the onions are soft. Turn up the heat to high and add your vegetables. You want to add them one at a time, by which ones will take longer to cook. I added my broccoli first, then the carrots, then peas. That way your broccoli doesn't end up uncooked while your peas are overcooked.

Once your vegetables are almost tender, add the rice, soy sauce, sesame oil, and pepper. Heat on high until rice is heated through. Make a well in the center and pour in your eggs. Let cook through and then break it up and mix it in. Taste and add a little more soy sauce if necessary. Serve immediately.

December 9, 2011

Ode to My Sewing Machine

Oh Singer 2639, how good you have been to me. You were my first sewing machine, and we've been together a long time. It seems like yesterday I was just learning to quilt and you've been an integral part of every project I've worked on since- from mending to quilting to making my own clothes.

My simple but effective machine.
I didn't do the best job of taking care of you in the beginning (I didn't actually know you required occasional maintenance). Despite that, you've been a faithful workhorse for ten years, and I know you're tired. When you finally gave out, it was not a shock. I got more out of you than I ever hope to.

It is with a twinge of regret that I must retire you now. My sewing needs have changed so much since we first met that I cannot justify spending twice your purchase price to fix what's broken. RIP, my friend.

December 1, 2011

3D Pinwheel Blocks Tutorial

I had a lightbulb moment a few days ago when I opened up the fat quarter bundle of Indian Summer fabrics I bought for the twin baby quilts. Initially, I wanted to use a charm pack, but I couldn't get the number of each pattern that I wanted with them, so I opted to just cut what I need from the fat quarters. They were all folded up and it occurred to me that instead of traditional pinwheels, I should do 3D ones!

The fabrics I'm using for these quilts- all but 5 in the collection
In order to make these 3D pinwheels, you only need 8 fabric squares of any size you like. Mine all were 5"x5". If you use a charm pack, these blocks will fly together, because all the cutting is already finished! But, the larger your starting squares, the larger the block will be. My finished blocks were just over 9".

I decided to use the same background color for all the pinwheels, for the first quilt that is the pink.  Next you want to pick 4 coordinating fabrics to be the pinwheels- I chose all different ones but you could do them all the same if you'd like.

The pink floral is the background for all the pinwheels.
You want to fold each piece in half, (corner to corner) press, and then fold them in half a second time and press to get small triangles.

Press them all in half (the circles are my ironing board)
Then all in half again, to get small triangles.
I spent a good while just pressing all of the pinwheels for both quilts (there are lots of them). I like to watch TV shows while I sew, so I just popped in the first season of The Wire (It's the best television show ever made, bar none) and pressed triangles for a couple episodes.

November 23, 2011

Thanksgiving Toffee Apple Dip

Hubby, Piper, and I are visiting my parents in NJ for Thanksgiving. My parents are very excited to meet their first "grandpuppy". They are probably going to spoil her rotten.

She's not a big fan of her cone (what a surprise) but she's stuck with it for a little while. She had a cherry eye that was taken care of before we picked her up, and she's got to keep the cone on so she doesn't scratch at her eye.

I was in charge of the snacks this year. I made the usual veggie and cheese platters, which are a huge hit with my family. But I saw a recipe not long ago that I knew I had to make as well. It's a caramel toffee fruit dip I found on Noble Pig. I may have been a bit hasty before when I suggested I knew the only fruit dip you'll ever need because this is pretty amazing. This one is definitely more geared towards apples, whereas the other dip is better suited for an assortment of fruits.


Caramel Toffee Fruit Dip

What You'll Need:
1 8 ounce package of cream cheese, room temp
3/4 cup brown sugar
1-1/2 teaspoons vanilla
1 teaspoon cinnamon
1/8 teaspoon nutmeg
1/2 a bag of Heath Bars, broken up into pieces

The Process:
Beat cream cheese, brown sugar, vanilla, cinnamon and nutmeg until smooth. Make sure the cream cheese is room temp, or it'll be harder to blend. Stir in Heath Bar bits and serve with some fruit of your choice. Granny Smith apples are what I'm taking to Thanksgiving because the slight tartness goes well with the sweetness of the dip.

Noble Pig's recipe has you use the Heath Toffee Bits which you find in the baking aisle, but somehow my grocery store didn't have any. So instead I picked up the small Heath Bars in the candy aisle. I smooshed the Heath Bars with my rubber mallet, which worked out well (and turned out to be a pretty good stress reliever, too).

I made this dip in less than ten minutes and it almost didn't make it to the party. I cut up one apple to try the dip- and the next thing I knew, the apple was gone and so was a bunch of the dip. Thankfully, I made a little extra. I bought the plastic container of cream cheese instead of the block in foil so I could put it right back into the container after it was made. It fit perfectly back into the container... but only because I had eaten an apple's worth.

I hope you all have a lovely and safe Thanksgiving! Happy travels, if you're traveling, as Hubby, Piper, and I will be. Don't kill yourselves falling into the trap of Black Friday sales tomorrow.

November 22, 2011

Vegetarian Chili With Butternut Squash

I'm sorry Meatless Monday is a little late, as you probably have noticed. However, I got a call from the vet early in the afternoon saying I could pick up my new dog early! I still had a lot to do before I picked her up, so even though I had all ready started dinner, I didn't get a chance to write up the post about it.


The original recipe came to me by way of the Twitter feed of Real Simple a few days ago. It's a slow cooker, which is the only reason I had dinner ready at all last night. They call for sweet potatoes, but I substituted butternut squash, since I still had enough of it left over. The squash was fine, but a little overdone, so I adjusted the recipe to compensate.

Vegetarian Chili

What You'll Need:
    1 medium red onion, chopped
    1 green pepper, chopped
    garlic cloves, chopped 
    1 Tbs chili powder 
    1 Tbs ground red pepper
    1 Tbs ground cumin 
    2 tsp unsweetened cocoa powder 
    1/4 tsp ground cinnamon 
    1 15.5 oz  can stewed tomatoes (I ran it through the processor to break it up a bit)
    1 15.5 oz can tomato soup
    1 cup dried black beans, soaked, cooked and rinsed 
    1 cup dried kidney beans, soaked, cooked and rinsed 
    8 ounces butternut squash, cut into bite sized pieces
    salt and black pepper to taste


Note on the beans: you can use canned beans if you want, one can of each, rinsed. 2 cups of dry beans (a pound bag) equals 4-5 cups cooked beans, depending on the type of bean. Therefore, 1 cup dry beans gives you approximately 1 can of cooked beans. Generally I get closer to 5 total out of a bag of kidney beans and black beans, but I like a little extra beans in my chili. I almost exclusively use dry beans nowadays, so the conversion is helpful.

The Process:
Soak your beans overnight if you can, or do a fast cook per the directions on the bag the day of. I did both beans together in the same pot, no problem.

Get your onions, pepper, garlic, spices, and a little olive oil and heat them over medium heat in a pan for a few minutes to get the flavors mingling. Deglaze the pan with a little of your tomato soup and add that plus everything but the squash into your slow cooker. Set on low for 7 hours. After the first hour, add in the squash. If you used sweet potato like the original recipe, definitely add it in with everything else.

Serve when the beans and squash are tender with a little grated cheddar cheese on top if you have any.

November 19, 2011

Welcome, Piper!

Hubby and I are about to welcome a new addition to the family- a beautiful beagle named Piper! We adopted her from the local shelter on Thursday, and she'll be coming home with us on Tuesday. She was found as a very skinny stray, with a chip that was never registered. She's a bit shy but incredibly sweet. It is such a shame that someone lost her, because she was obviously loved (and somewhat trained, too).

Look at that tail blur!
I grew up with a dog, (a wonderful American Cocker named Dante) and it's been strange living without one. Hubby finally agreed that it was OK for us to get one, although I don't think he anticipated the speed at which I would obtain one (took me all of a whole day to find this sweet girl). Things are really getting exciting here.

On an unrelated note, my mother was kind enough to mail me her sewing machine so I could start working on projects again. Yay! She doesn't sew as prolifically as I do, she mostly does small house projects and fixes clothes with it, so she said I could borrow it until I got a replacement. That means sewing projects are back on the table!

However, they will have to wait until after Thanksgiving, because I have a house to beagle-proof. Beagles aren't new to me, so I am pretty well aware of what I am in for (for better or worse). After the holiday though, I will have new recipes to share and an update on the pinwheel quilts I am making for two special little girls (sneak peek- I ordered that Riley Blake fabric).

November 14, 2011

Meatless Monday: Fall Pasta Primavera

It's been a while since I did anything special for Meatless Monday, so tonight I thought I'd step it up a notch and make this one a follow-along tutorial. Tonight, I made tri-colored pasta primavera with fall vegetables. Generally speaking, primavera is all about spring veggies, but it's Autumn so I thought I would give it a little fall twist. I found an acorn squash at the market today, and I knew it would be perfect.

Most  primavera recipes call for chicken broth to form the body of the sauce, but since this is a Meatless Monday selection, I opted to use vegetable broth instead, and it worked out just as nicely.

Fall Pasta Primavera
Makes 4 servings

What You'll Need:
    2 cups dried pasta of your choice
    1 acorn squash
    1 zucchini
    1/2 butternut squash (I cheated and used pre-cut)
    1/2 can vegetable broth
    3 Tbs balsamic vinegar
    2 garlic cloves, minced
    2 Tbs minced dried shallots
    1 Tbs crushed sage
    1 Tbs crushed rosemary
    1/2 cup grated Parmesan cheese
    Cracked pepper and sea salt to taste

That basil? Pretend it's sage. I grabbed the wrong one for the photo.

November 10, 2011

Cranberry Almond Granola Bars

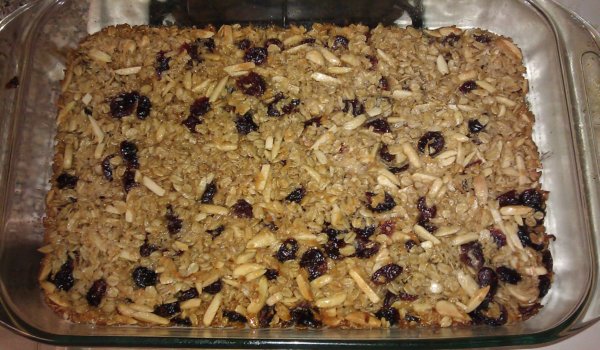
I am a huge fan of granola bars, but I've been disappointed by the ones you buy in the store too many times. I thought it'd be fun to try and make my own. I like chewy granola bars, so it was perfect that I found this recipe on King Arthur Flour's website.

It was nice and crispy on the edges, the best part.
The nice thing about this recipe is that you can basically add any combination of goodies that you want as long as you have 2-3 cups total. I decided that I wanted a combination of dried cranberries, almond slivers, and flaked coconut. I got some excellent dried cranberries from my local Trader Joe's. I love that place. But you could add anything you'd like, including chocolate chips, peanuts, walnuts, raisins, blueberries, mini marshmallows... the list goes on. Use whatever strikes your fancy.

King Arthur Flour has you use their Sticky Bun Sugar, but I didn't have access to any on short notice. Instead, I used the substitute recipe they provided. I had a few problems though, the first of which was that the bars never really set. I even baked them for an extra 30 minutes. This may entirely be due to the replacement of the Sticky Bun Sugar, but I'd suggest using a little less liquid.

Chewy Granola Bars

What You'll Need:
    1 2/3 cups quick rolled oats
    1 cup + 2 tablespoons Sticky Bun Sugar
    1/3 cup granulated sugar
    1/3 cup oat flour (1/3 cup quick oats, processed till finely ground in a food processor)
    1/2 teaspoon salt
    1/4 teaspoon ground cinnamon
    2 to 3 cups dried fruits and nuts
    1 teaspoon vanilla extract
    1/4 cup melted butter
    1/4 cup honey or maple syrup
    1 tablespoon water

November 7, 2011

Back and ready for action!

I'm officially hitched, back at home, and ready to jump back into the some blogging action. The weather was gorgeous, I got to see all my family again, and I just had such a wonderful time. But for now, I just wanted to share a photo from the day:


I got a lot of kitchen gadgets as wedding presents (thank you all so much!) so I have a ton of fancy new things to try, and I will be doing quite a few posts on them. I also have those Dark Elf Black Dragon photos that I promised, which will hopefully go up tomorrow.

November 1, 2011

A Little Wedding Break

I'm heading up to New Jersey today to stay with my parents until the wedding, since there's lots to do, and I can't do it all from VA. Actually, when this post goes up I will all ready be on the road. Well, that assumes I will have gotten the car packed without forgetting anything important.

Things have just been so crazy here lately. Hubby-to-be has been contemplating a job change, which also entails a huge relocation, all the while I've been trying to get the wedding together. Because of the sewing machine snafu, I wasn't able to get some posts together to go up while I am busy doing the whole wedding thing. Sorry about that.

I'll be back in a week, and I have some cool things in store for when I get home. Just a teaser:

Related Posts Plugin for WordPress, Blogger...