As I mentioned before, Hubby-to-be and I are tying the knot in just about a month. The big day is November 5th. So, not surprisingly, I have a thousand things to do. This week, one of those things was trying on my dress again. I wanted to make sure it still fit right, that it looked right, all that.
It has a corset-style back, and since Hubby-to-be isn't allowed to see it, I had to get creative to try it on while I was home alone. I laced the back up, tied a loose knot, slid it over my head, and then tightened the lacing up while it was one. It worked pretty well.
I thought the skirt looked kind of weird at the hips, like puffed out. But the train was spread out, so I took it off to bustle it up and see how the hips looked then. Then I discovered something surprising.
There. is. no. bustle.
But... but... the woman in the dress boutique bustled the sample dress for me in the shop. I saw it, and it was gorgeous. I did some looking into it on the internet, and it turns out I had to actually order the bustle on the dress, it's an upcharge. Uh, what? It has a 5 foot long train! I bought a dress from a respectable designer and the bustle doesn't come included with the dress?
After a little initial panicking, I realized I could just put in a French bustle without too much trouble. After a lot of pinning, trying on and taking off I finally got a two point bustle in place, and it looks really close to the one I saw on the sample dress. Best part, I can actually dance during the reception now! Woohoo!
Crisis averted, I now only have 999 things left to do.

One little dinosaur's adventures through quilting and cooking.
September 30, 2011
September 22, 2011
Home Made Vanilla Extract
Fall has officially begun (according to the unseasonably cool weather I've had lately) and there is nothing so lovely as baking in the fall. Something that is critically important to a plethora of my favorite recipes is vanilla. I love cooking with vanilla beans, but they're not always right for baked goods.
For those fall favorites, you really need vanilla extract. Unfortunately, the fake stuff is, well, fake and the good stuff is frankly quite expensive. But I have a good solution for you- making your own! It's easy, inexpensive, and it tastes great (in your baked goods).

All you need is: vanilla beans, vodka, and a glass container. No joke. Well, those things and a good, sharp knife. I prefer to use amber glass bottles because I like the look, but you can use whatever glass bottle you like as long as it has a tight fitting cap.
What You'll Need:
3 vanilla beans
1 cup vodka (100 proof is ideal)
Glass container
The Process:
Slice your vanilla beans in half lengthwise. Put them into your bottle, cutting them in half if necessary to fit. Pour in your vodka and cap the bottle. Now put on your patient pants and wait. Give it a good shake once a week for about 2 months. Ideally, it should be stored in a dark place unless you used an amber glass bottle (sunlight is not good for it). After 2 months, it is ready to use and will last you for years if you top it off with a little more vodka after each use.
Vodka is typically used because it does not have a flavor that interferes with the flavor of the beans. However, you could use a rum if you want to have a little extra depth to your extract. I have a bottle of each, because vanilla rum extract (as I've dubbed it) doesn't work for all baked goods, but is really good in many cakes.
September 19, 2011
Red Lobster-Style Cheddar Biscuits
Being on a budget can be no fun at times. Hubby-to-be and I have a wedding to pay for in less than two months (I can't believe it's almost here), so we've been keeping a tight leash on our finances. That means eating out less, which is just as good for our budget as it is for our health a lot of times. However, every time I see a Red Lobster commercial, my mouth starts to water at the thought of those infamous Cheddar Bay Biscuits.
It came time to try and make my own. Ages ago I heard you could easily make your own using Bisquick mix, cheddar cheese, and garlic. This weekend I couldn't take it anymore and had to try to make some of my own. All told, they came out nearly as delicious as the originals, except I should have added more garlic. The recipe below includes the additional garlic.
Almost Cheddar Bay Biscuits
What you need:
2 cups Bisquick mix
2/3 cup milk (I used buttermilk because I had some leftover)
1/2 stick butter, cubed
2/3 cup shredded cheddar cheese
1/2 tsp ground garlic
It came time to try and make my own. Ages ago I heard you could easily make your own using Bisquick mix, cheddar cheese, and garlic. This weekend I couldn't take it anymore and had to try to make some of my own. All told, they came out nearly as delicious as the originals, except I should have added more garlic. The recipe below includes the additional garlic.
 |
| Tasty, tasty biscuits. |
What you need:
2 cups Bisquick mix
2/3 cup milk (I used buttermilk because I had some leftover)
1/2 stick butter, cubed
2/3 cup shredded cheddar cheese
1/2 tsp ground garlic
September 15, 2011
That Other Hobby
**Update** All miniature gaming and painting posts have been moved over to my new Warhammer-specific site, Chickhammer. Check it out for my latest hobby updates and news.
I mentioned before that I have another major hobby outside of my crafting and cooking. That hobby is a little thing called Warhammer 40,000. It will shortly be taking over my life. As I mentioned in a previous post it is a table top wargaming deal and it's pretty much my favorite game ever.
This is an expensive, time consuming, and male nerd dominated hobby
(insert rant about the rampant misogyny of nerd culture here). But,
Hubby-to-be loves it and I quickly realized that I do, too. I have another page called Chickhammer where I talk about all my Warhammer and miniature painting related things.
I mentioned before that I have another major hobby outside of my crafting and cooking. That hobby is a little thing called Warhammer 40,000. It will shortly be taking over my life. As I mentioned in a previous post it is a table top wargaming deal and it's pretty much my favorite game ever.
 |
| This is what I do when I'm not quilting. |
September 13, 2011
Butternut Squash Ravioli and Maple Cream Sauce
While the weather may not agree, I've decided it's now time for all things fall. Amid my mission for my usual Costco staples yesterday, I came across the most wonderful looking raviolis. Now, I will probably have to make these from scratch at some point, but I haven't made my own pasta before so I wasn't about to start with one that has a filling. I snapped these babies off the shelf as if they were the last ones in the world.
I was wondering what I would serve them with when I remembered that Hubby-to-be and I have decided to start a Meatless Monday campaign. There are myriad reasons people do meatless Mondays, but chief among them for us was meat is expensive and being healthier is something we both can use. And so, the raviolis became a meal unto themselves instead of a side dish.
I was wondering what I would serve them with when I remembered that Hubby-to-be and I have decided to start a Meatless Monday campaign. There are myriad reasons people do meatless Mondays, but chief among them for us was meat is expensive and being healthier is something we both can use. And so, the raviolis became a meal unto themselves instead of a side dish.
 |
| Be kind, this is my first food photo. |
September 12, 2011
Hubby's French Onion Soup
This weekend was Hubby-to-be's birthday. When I asked him what he wanted me to make for his birthday dinner, I got little more than a shrug in response. So I thought about foods he likes and liver and onions was the first thing that popped in my mind. Seriously. That really is his favorite. I have never made it because I've not seen a liver for sale that didn't look diseased. It doesn't help that I grew up hearing horror stories about liver and onions from my mother's youth.
Onions, though, I can work with. I remembered that one of Hubby-to-be's favorite foods also happens to be French Onion Soup. I scoured the internet for recipes and I found one from Simple Recipes that seemed perfect. I even had most of the ingredients on hand. My favorite part was that it used olive oil and not butter to cook down the onions, which makes it a bit healthier.
I also saw a lot of recipes that add a little flour to thicken it, but this one didn't and it is totally unnecessary. To give it a little more oomph, I added some Worcestershire sauce, because, well, I saw it when grabbing my bay leaf and I knew it would be a tasty addition. Lastly, I scaled it down a little since it's just the two of us.
Hubby's French Onion Soup
Serves 4
Adapted from Simple Recipes
What You'll Need:
3 medium yellow onions
1/4 teaspoon sugar
1 clove garlic, minced
6 cups beef stock (stock gives a better flavor than broth)
1/2 cup dry white wine (I used a chardonnay. You can also omit this if you prefer)
1 Tbs Worcestershire sauce
1 bay leaf
1/4 teaspoon of thyme (I had fresh thyme from my garden, but dry is fine, too)
French bread, sliced and toasted
1 cup grated Swiss Gruyere cheese
Onions, though, I can work with. I remembered that one of Hubby-to-be's favorite foods also happens to be French Onion Soup. I scoured the internet for recipes and I found one from Simple Recipes that seemed perfect. I even had most of the ingredients on hand. My favorite part was that it used olive oil and not butter to cook down the onions, which makes it a bit healthier.
 |
| Just the right amount of browned cheesiness. |
Hubby's French Onion Soup
Serves 4
Adapted from Simple Recipes
What You'll Need:
3 medium yellow onions
1/4 teaspoon sugar
1 clove garlic, minced
6 cups beef stock (stock gives a better flavor than broth)
1/2 cup dry white wine (I used a chardonnay. You can also omit this if you prefer)
1 Tbs Worcestershire sauce
1 bay leaf
1/4 teaspoon of thyme (I had fresh thyme from my garden, but dry is fine, too)
French bread, sliced and toasted
1 cup grated Swiss Gruyere cheese
September 9, 2011
Not So Fast, Flynn Quilt Frame!
I really thought it was time. I finished up my work, Hubby-to-be's car definitely didn't need a jump and I was going to quilt with my frame that I painstakingly set up this week. Then I was foiled by a technicality.
Take a closer look...
 | ||
| Something isn't quite right. |
September 8, 2011
Flynn Quilt Frame Review: The Set Up
I would first like to point out that I do enjoy the Flynn Multi-Frame. I really do. That being said, I do have some frustrations to vent out. It comes with 48" rods for you to roll your quilt, batting, and backing onto. That means you can put a quilt top up to 40" wide on it (there needs to be 4" to spare on either side). That Halloween quilt I wanted to put on it? It's 56" inches wide. So right off the bat, I had to buy new goodies for it.
After going to 3 different stores to find the conduit I needed, I had the appropriately sized rods. I bought double sided tape because I couldn't find any carpet tape, which is what the company recommends. I used some muslin from my stash to make the leader strips. The tape stuck to the rod, but not to the fabric. So I doubled down with some packing tape and secured the muslin with it. It took forever, but thankfully, I only have to do it once per set.
Then came rolling the backing onto the the rod. You're supposed to baste the backing to the muslin, then roll it up. Sounds simple enough, right? In order to get it rolled up nice and straight on the rod, I had to try and fail more times than I care to admit to openly. The company recommends rolling them up on the carpet. I don't, unless you don't have a choice (however, I do). The table results were much better.
 |
| Getting the top and batting rolled together was the easier part. |
September 7, 2011
Seascape Quilt, Part 2
I initially started this project to fill the empty wall in my apartment. Now that we actually moved, I intentionally left a blank wall in the living room for it. It'd be a shame to have it finished but no where to put it. I have the first major step completed, the top itself is now finished!
I'm really happy with how the colors seem to blend together on the right, not so much on the left. A lesson for next time. I think it will be a lot less noticeable once it has the sea critters on it. I am putting some jelly fish, an octopus, and some plant life on there for sure. I don't know exactly what else I will do yet. I have some interesting notions that I have been saving just for this. I'll just have to see what comes to me.
This one likely will not end up getting quilted once I'm finished with it. Once I appliqué the sea creatures and embroider the details, I will probably finish the edges and hang it up as-is. I'm not allowed to put any nails in the walls here, so a traditional quilt hanging method is out of the question. I am a fan of those 3M sticky tabs, and without the added weight of batting and backing, I've successfully hung smaller quilts that way previously. If that doesn't do the trick I might end up just using thumb tacks (gasp!). Maybe I don't want to go poking holes through my new piece of art.
 |
| Sorry it's a little blurry. |
I'm really happy with how the colors seem to blend together on the right, not so much on the left. A lesson for next time. I think it will be a lot less noticeable once it has the sea critters on it. I am putting some jelly fish, an octopus, and some plant life on there for sure. I don't know exactly what else I will do yet. I have some interesting notions that I have been saving just for this. I'll just have to see what comes to me.
This one likely will not end up getting quilted once I'm finished with it. Once I appliqué the sea creatures and embroider the details, I will probably finish the edges and hang it up as-is. I'm not allowed to put any nails in the walls here, so a traditional quilt hanging method is out of the question. I am a fan of those 3M sticky tabs, and without the added weight of batting and backing, I've successfully hung smaller quilts that way previously. If that doesn't do the trick I might end up just using thumb tacks (gasp!). Maybe I don't want to go poking holes through my new piece of art.
September 5, 2011
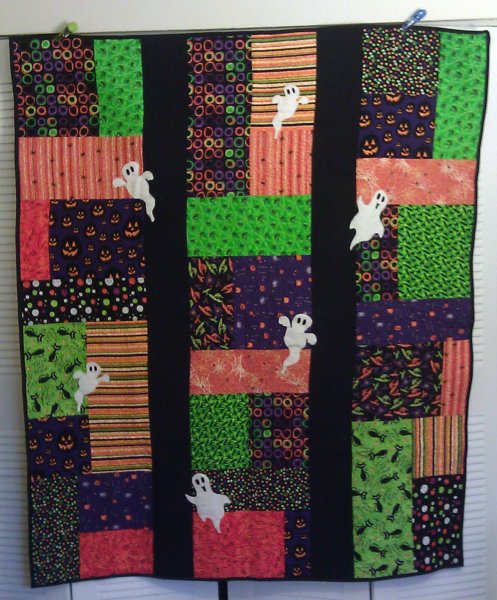
Halloween Circle Quilt
This little number has been hanging out in my stash since last September. On a whim, I bought a Moda Layer Cake from the Haunted Mansion collection. I had never experimented with the precuts before that, so I was really excited to try it out. I ended up having no idea what to do with it for a while. Then, I found a fabric with a concentric circles pattern on it, and the inspiration for this quilt was born.
 After assembling the blocks was as simple, but then I didn't know what to do with them. The black sashing is simple to make the Halloween prints really stand out. The border and backing are both from the collection, and I made the binding from one of the collection's prints, too.

September 1, 2011
The Most Wondeful Time of the Year (is almost here)
A lot of people dig the winter holidays most of all the year's celebrations. While I am certainly a fan (especially now that I celebrate both Christmas and Chanukah because of Hubby-to-be), neither are my favorite. Hands down, more than anything else, Halloween is the best holiday ever (for me). I loved it as a kid, I really loved it as a college student, and I love it still (and probably always will). There is something about dressing up, handing out candy, and all those messy spider webs that I just can't get enough of.
I usually have a day-long house decorating party (with myself) on October 1st to kick off the holiday. However, this year, I decided that if all the stores can start selling Halloween stuff in August, I can bring out a few of my favorite items a little early to enjoy them longer. One of my most favorite items is a new addition from last year: a Halloween quilt.

I usually have a day-long house decorating party (with myself) on October 1st to kick off the holiday. However, this year, I decided that if all the stores can start selling Halloween stuff in August, I can bring out a few of my favorite items a little early to enjoy them longer. One of my most favorite items is a new addition from last year: a Halloween quilt.
Subscribe to:
Posts (Atom)